# Native
Source: https://docs.buzzvil.com/en/docs/buzzbenefit-android/v6/native
Platform: Android
SDK major version: v6
Language: English (en)
Translation: AI-translated from Korean. Original: https://docs.buzzvil.com/docs/buzzbenefit-android/v6/native
Learn how to add and configure native placements and implement additional features through the SDK interface.
## Key features
The Buzzvil SDK's native inventory displays ads customized for your app that blend naturally into its screens. After a user engages with an ad, the next ad appears automatically, continuously serving ads in a single placement to accelerate app monetization. It also provides dynamic features that encourage users to engage with more ads.
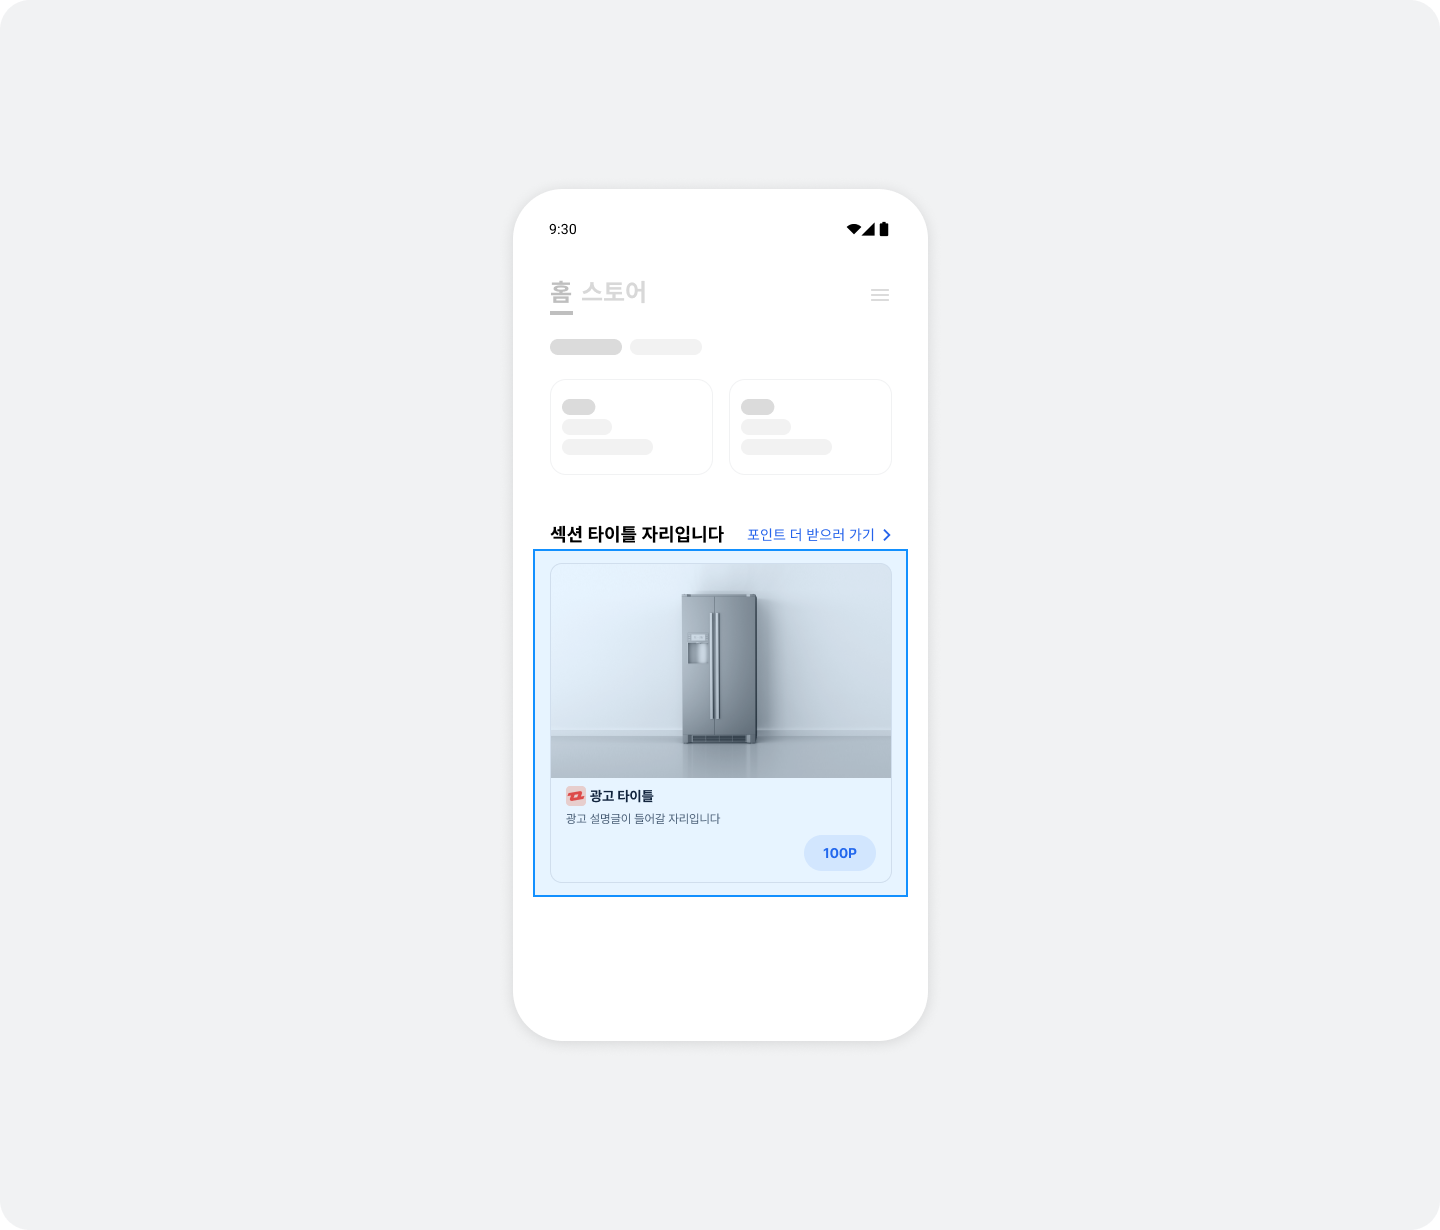
## Integration
Follow these steps to integrate native placements into your app.
### Step 1. Prepare
- Complete [Getting started](https://docs.buzzvil.com/en/docs/buzzbenefit-android/v6/getting-started).
- Obtain a Unit ID for the native placement (referred to below as `YOUR_NATIVE_UNIT_ID`).
### Step 2. Configure the ad layout
See the illustration and table below for the components and UI of a native ad layout. 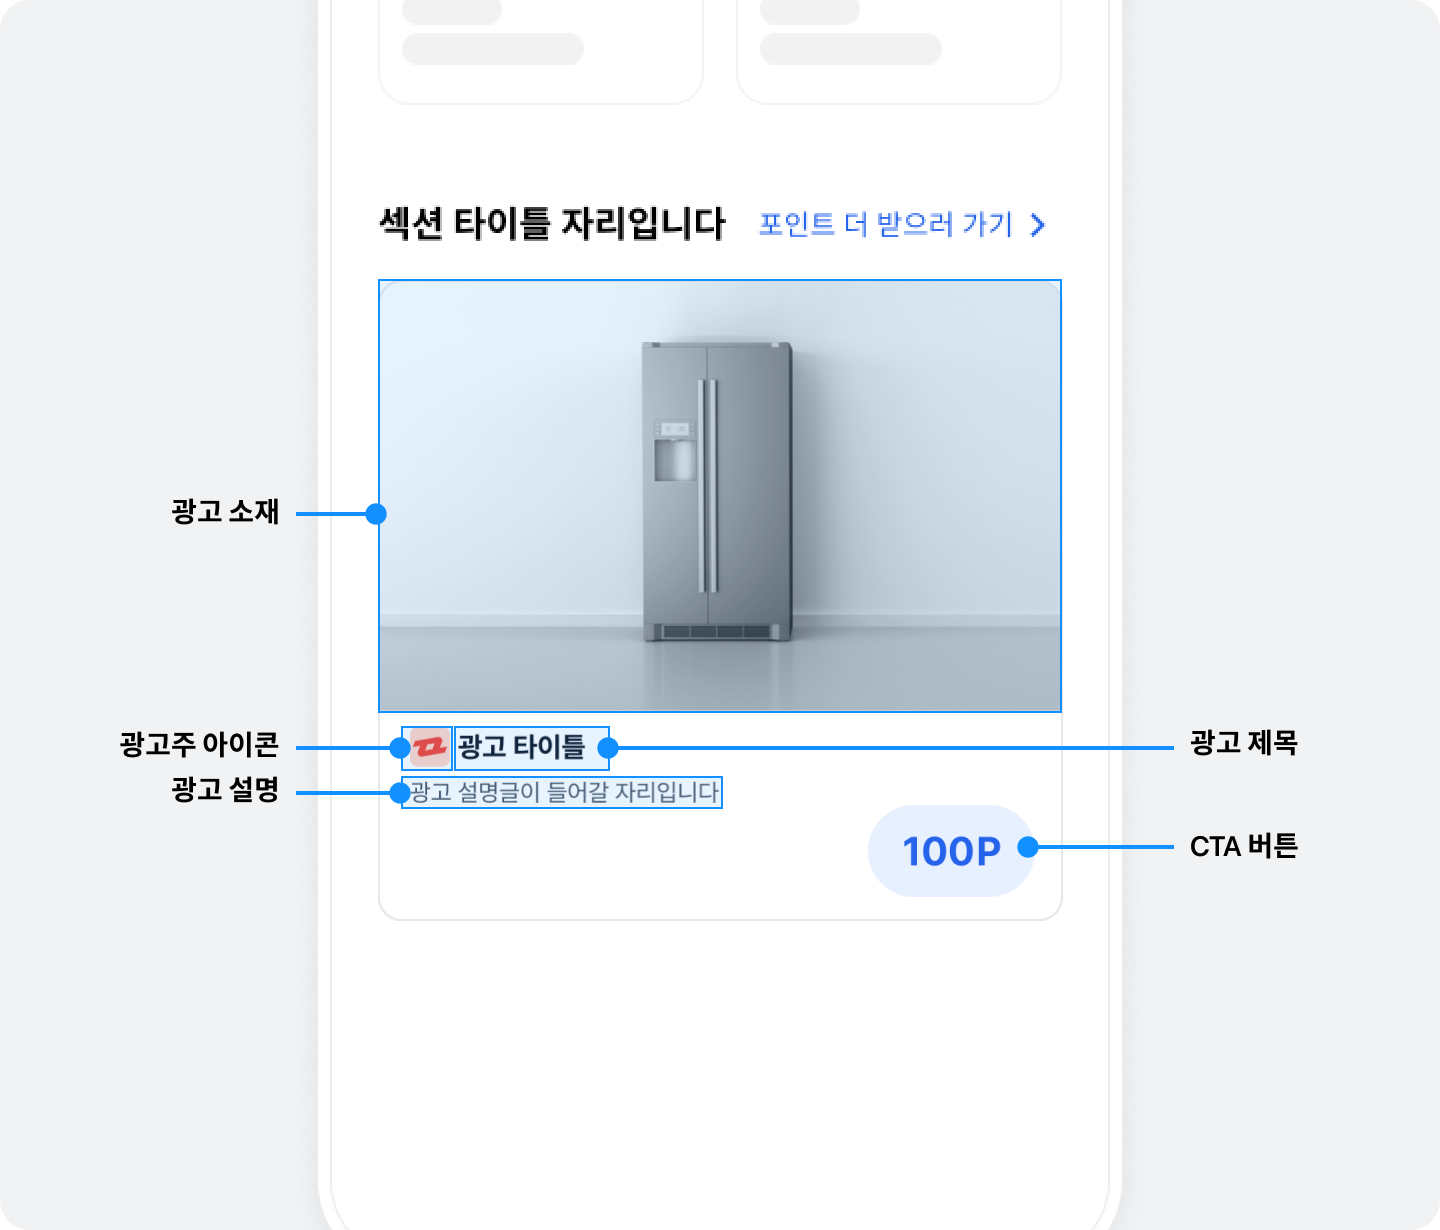
| Component | Description |
| ----------------------------------- | ----------------------------------------------------------------------------------------------------------------------------------------------------------------------------------------------------------------------------------------------------------------------------------------------------------------------------------------------------------------------------------------------------------------------------------------------------------------------------------------------------------------------------------------------------------------------------------------------------------------------------------------------------------------------------- |
| Ad title (_required_) | The ad's title. We recommend no more than 10 characters. You can replace part of the text with an ellipsis as needed, regardless of character count. |
| Ad creative (_required_) | - The ad's image, video, or other creative. You must preserve its aspect ratio.
- Display it using `com.buzzvil.buzzbenefit.buzznative.BuzzMediaView`.
- Size: 1,200 x 627 px
- You can add margins. Contact your Buzzvil account manager for details. |
| Ad description (_required_) | A detailed description of the ad. We recommend no more than 40 characters. You can replace part of the text with an ellipsis as needed, regardless of character count. |
| Advertiser icon (_required_) | * The advertiser's icon image. You must preserve its aspect ratio.
* Size: 80 x 80 px |
| CTA button (_required_) | - A button that encourages participation. We recommend no more than 7 characters. You can replace part of the text with an ellipsis as needed, regardless of character count.
- Display it using `com.buzzvil.buzzbenefit.DefaultBuzzCtaView`.
- To change the button color, see [Primary color](https://docs.buzzvil.com/en/docs/buzzbenefit-android/v6/ui-configuration#%EC%A3%BC%EC%9A%94-%EC%83%89%EC%83%81). For other design changes, see [Implement a custom CTA button](https://docs.buzzvil.com/en/docs/buzzbenefit-android/v6/ui-configuration#cta-%EB%B2%84%ED%8A%BC-%EC%9E%90%EC%B2%B4-%EA%B5%AC%ED%98%84%ED%95%98%EA%B8%B0) and replace it with your own design. |
| BenefitHub entry point (_required_) | An entry point that takes users directly to BenefitHub when clicked. |
| Ad disclosure (_recommended_) | Text identifying the content as an ad (for example, `광고`, `ad`, `스폰서`, or `Sponsored`). |
Build the native ad layout in an activity or fragment according to the structure below. Implement a layout (`your_native_ad.xml`) that meets the specifications of `BuzzNativeAdView`.
The following is an example layout for `BuzzNativeAdView`.
> ✏️ **Note**\
> You can design the BenefitHub entry point layout freely. We recommend text explaining that it opens BenefitHub and an arrow icon, as shown in the illustration.
```xml
...생략...
```
Implement the BenefitHub entry point in code.
```kotlin
import com.buzzvil.buzzbenefit.benefithub.BuzzBenefitHub
val yourNativeToBenefitHubEntryPoint: View = ...
yourNativeToBenefitHubEntryPoint.setOnClickListener {
BuzzBenefitHub.show(context)
}
```
> ✏️ **Note**\
> To implement a native placement using something other than an activity or fragment, contact your Buzzvil representative at .
### Step 3. Display ads
Follow these steps and the sample code to display ads in the ad layout.
1. Use `YOUR_NATIVE_UNIT_ID` to create a `BuzzNative` object.
2. Use `BuzzNativeViewBinder.Builder` to configure every view required to display an ad, including `BuzzNativeAdView` and `BuzzMediaView`. Call `build()` to create a `BuzzNativeViewBinder` object.
3. Call `load()` on `BuzzNative` to allocate an ad. Use `onSuccess` and `onFailure` to add behavior for successful and failed allocations.
4. (Optional) Register `BuzzNativeAdEventsListener` on `BuzzNative` to implement UI according to the ad request state.
- If allocation fails, no ad appears in the layout. Register `BuzzNativeRefreshEventsListener` to define failure behavior.
- When the user completes participation (the CTA view shows the completion label `참여 완료` (Participation complete)) and returns to the native placement, it automatically refreshes to the next ad.
5. Call `bind()` on the `BuzzNativeViewBinder` object to display the allocated ad in the layout. Calling `bind()` without an allocated ad triggers the `onFailure` event on `BuzzNativeRefreshEventsListener`.
> ✏️ **Note**
>
> - Non-rewarded content without a completion state and ads already completed by the user refresh to the next ad when the user returns from the landing page to the native placement.
> - The placement does not refresh while the user is participating in an ad (when the CTA View says that participation is being checked).
> - To disable automatic ad refresh, contact your Buzzvil representative at .
```kotlin
import com.buzzvil.buzzbenefit.BuzzAdError
import com.buzzvil.buzzbenefit.buzznative.BuzzNative
import com.buzzvil.buzzbenefit.buzznative.BuzzNativeAd
import com.buzzvil.buzzbenefit.buzznative.BuzzNativeRefreshEventsListener
import com.buzzvil.buzzbenefit.buzznative.BuzzNativeViewBinder
val buzzNativeAdView = findViewById(R.id.buzzNativeAdView)
val buzzMediaView = findViewById(R.id.buzzMediaView)
val titleTextView = findViewById(R.id.textTitle)
val descriptionTextView = findViewById(R.id.textDescription)
val iconImageView = findViewById(R.id.imageIcon)
val buzzCtaView = findViewById(R.id.buzzCtaView)
// 광고 레이아웃을 설정합니다.
val binder: BuzzNativeViewBinder = BuzzNativeViewBinder.Builder()
.buzzNativeAdView(buzzNativeAdView)
.buzzMediaView(buzzMediaView)
.titleTextView(titleTextView)
.descriptionTextView(descriptionTextView)
.iconImageView(iconImageView)
.buzzCtaView(buzzCtaView)
.build()
// BuzzNative 객체를 생성합니다.
val buzzNative = BuzzNative(Constant.YOUR_NATIVE_UNIT_ID)
// BuzzNative에서 광고를 할당받습니다.
buzzNative.load(
onSuccess = { nativeAd ->
// 광고 할당에 성공하면 호출됩니다.
// 이후에 광고 갱신 시 onRequest()가 다시 호출됩니다.
// 광고 자동 갱신을 성공할 때마다 반복적으로 호출됩니다.
Toast.makeText(this@MainActivity, "onSuccess : 광고 할당 성공 ${nativeAd.title}", Toast.LENGTH_SHORT).show()
// 할당받은 광고를 화면에 표시합니다.
binder.bind(buzzNative)
},
onFailure = { adError ->
// 최초 광고 할당에 실패하면 호출됩니다.
Toast.makeText(this@MainActivity, "onFailure : 광고 할당 실패 ${adError.type.name}", Toast.LENGTH_SHORT).show()
}
)
// (Optional) 광고 요청 상태에 따른 UI를 구현합니다. load() 이후에 Listener 등록을 시도해주세요
buzzNative.setRefreshEventsListener(object : BuzzNativeRefreshEventsListener {
override fun onRequest() {
// 광고 할당을 요청한 상태입니다.
// 이후에는 onSuccess() 또는 onFailure() 중 하나가 호출됩니다.
// 광고 자동 갱신을 시도할 때마다 반복적으로 호출됩니다.
// 로딩 화면 등을 구현할 수 있습니다.
Toast.makeText(this@MainActivity, "onRequest", Toast.LENGTH_SHORT).show()
}
override fun onSuccess(buzzNativeAd: BuzzNativeAd) {
// 광고 할당에 성공하면 호출됩니다.
// 이후에 광고 갱신 시 onRequest()가 다시 호출됩니다.
// 광고 자동 갱신을 성공할 때마다 반복적으로 호출됩니다.
// 로딩 화면 등을 구현한 경우, 여기에서 로딩을 종료합니다.
Toast.makeText(this@MainActivity, "onSuccess", Toast.LENGTH_SHORT).show()
}
override fun onFailure(adError: BuzzAdError) {
// 광고 할당에 실패하면 호출됩니다.
// 로딩 화면 등을 구현한 경우, 여기에서 로딩을 종료합니다.
Toast.makeText(this@MainActivity, "onFailure: ${adError.type.name}", Toast.LENGTH_SHORT).show()
}
})
```
> ✏️ **Note**
>
> - If the initial allocation request fails, `onFailure()` on `load()` is called and no ad appears. For details about the `BuzzAdError` error code for failed allocation, see [An error code appears](https://docs.buzzvil.com/en/docs/buzzbenefit-android/v6/troubleshooting#%EC%98%A4%EB%A5%98-%EC%BD%94%EB%93%9C%EA%B0%80-%EB%82%98%ED%83%80%EB%82%A9%EB%8B%88%EB%8B%A4).
> - If no ad is available during a refresh, the `onFailure()` callback on `BuzzNativeRefreshEventsListener` is called and the previous ad remains.
> ✏️ **Note**\
> Q. Why distinguish success and failure of the initial request from subsequent requests?\
> A. If the initial request fails, there is no ad to show, so the associated layout should be hidden. If a later request fails, the previously allocated ad can remain visible. These cases therefore need different handling.
### Step 4. Test the basic integration
After completing the basic integration, verify that ads are allocated and displayed correctly. Also check that `NativeToFeedLayout` (the layout in the native placement that opens BenefitHub) works and opens BenefitHub when clicked.
### Ad operation policy (mandatory requirements)
#### 1. Do not refresh ads
- Make the initial ad request only once when the app screen opens.
- Subsequent ad requests (reallocations) are allowed only after a clear user action, such as a screen transition.
- Automatically refreshing ads at fixed intervals or continuously requesting new ads is prohibited.
> Excessive ad requests can harm the user experience, ad performance, and revenue.
#### 2. Do not selectively use only impression-based ads
- Buzzvil combines different ad types to provide an optimized ad experience.
- API integrations must not selectively use only a specific ad type, such as impression-based ads.
- SDK integrations must not request ads from another platform when impression-based ads are unavailable.
- Operate all ad types in balance according to Buzzvil's ad logic.
> Restricting or selectively using ad types negatively affects Buzzvil's ad operation strategy and revenue optimization.
## Additional features
This section explains how to implement additional native placement features.
### Use a native overlay
> ✏️ **Note**\
> To configure the native overlay UI, see [Native overlay UI](https://docs.buzzvil.com/en/docs/buzzbenefit-android/v6/ui-configuration#%EB%84%A4%EC%9D%B4%ED%8B%B0%EB%B8%8C-%EC%98%A4%EB%B2%84%EB%A0%88%EC%9D%B4-ui).
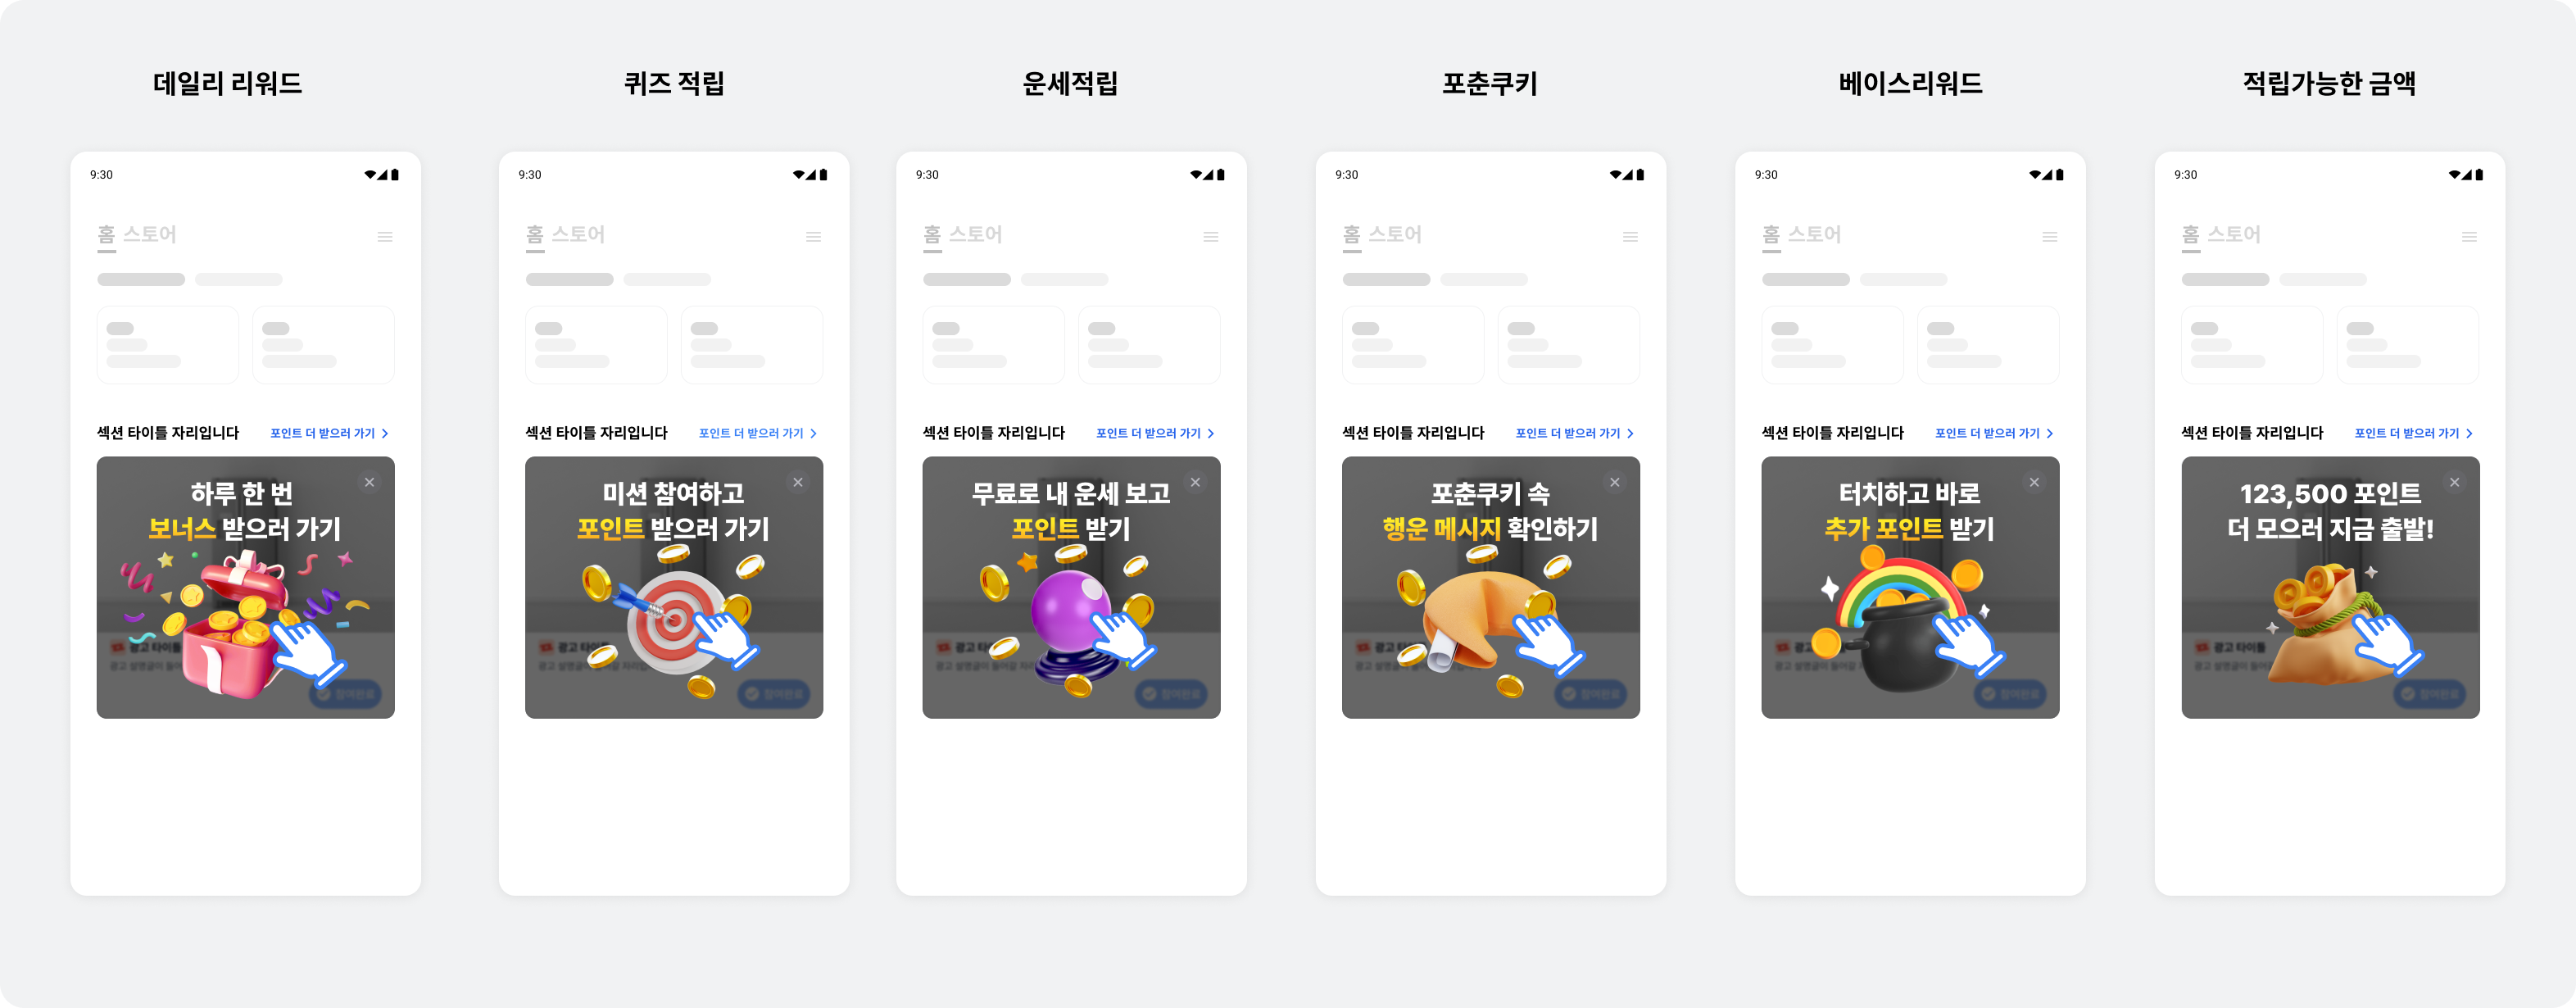
Native overlays require no separate integration or implementation. When a user returns to your app after participating in a native ad, an overlay appears over the completed ad to encourage entry into BenefitHub. The overlay contains text and an icon, covering the entire native area (`NativeAdView`) to encourage a click. It disappears automatically when the user clicks Close, or clicks the overlay and then returns.
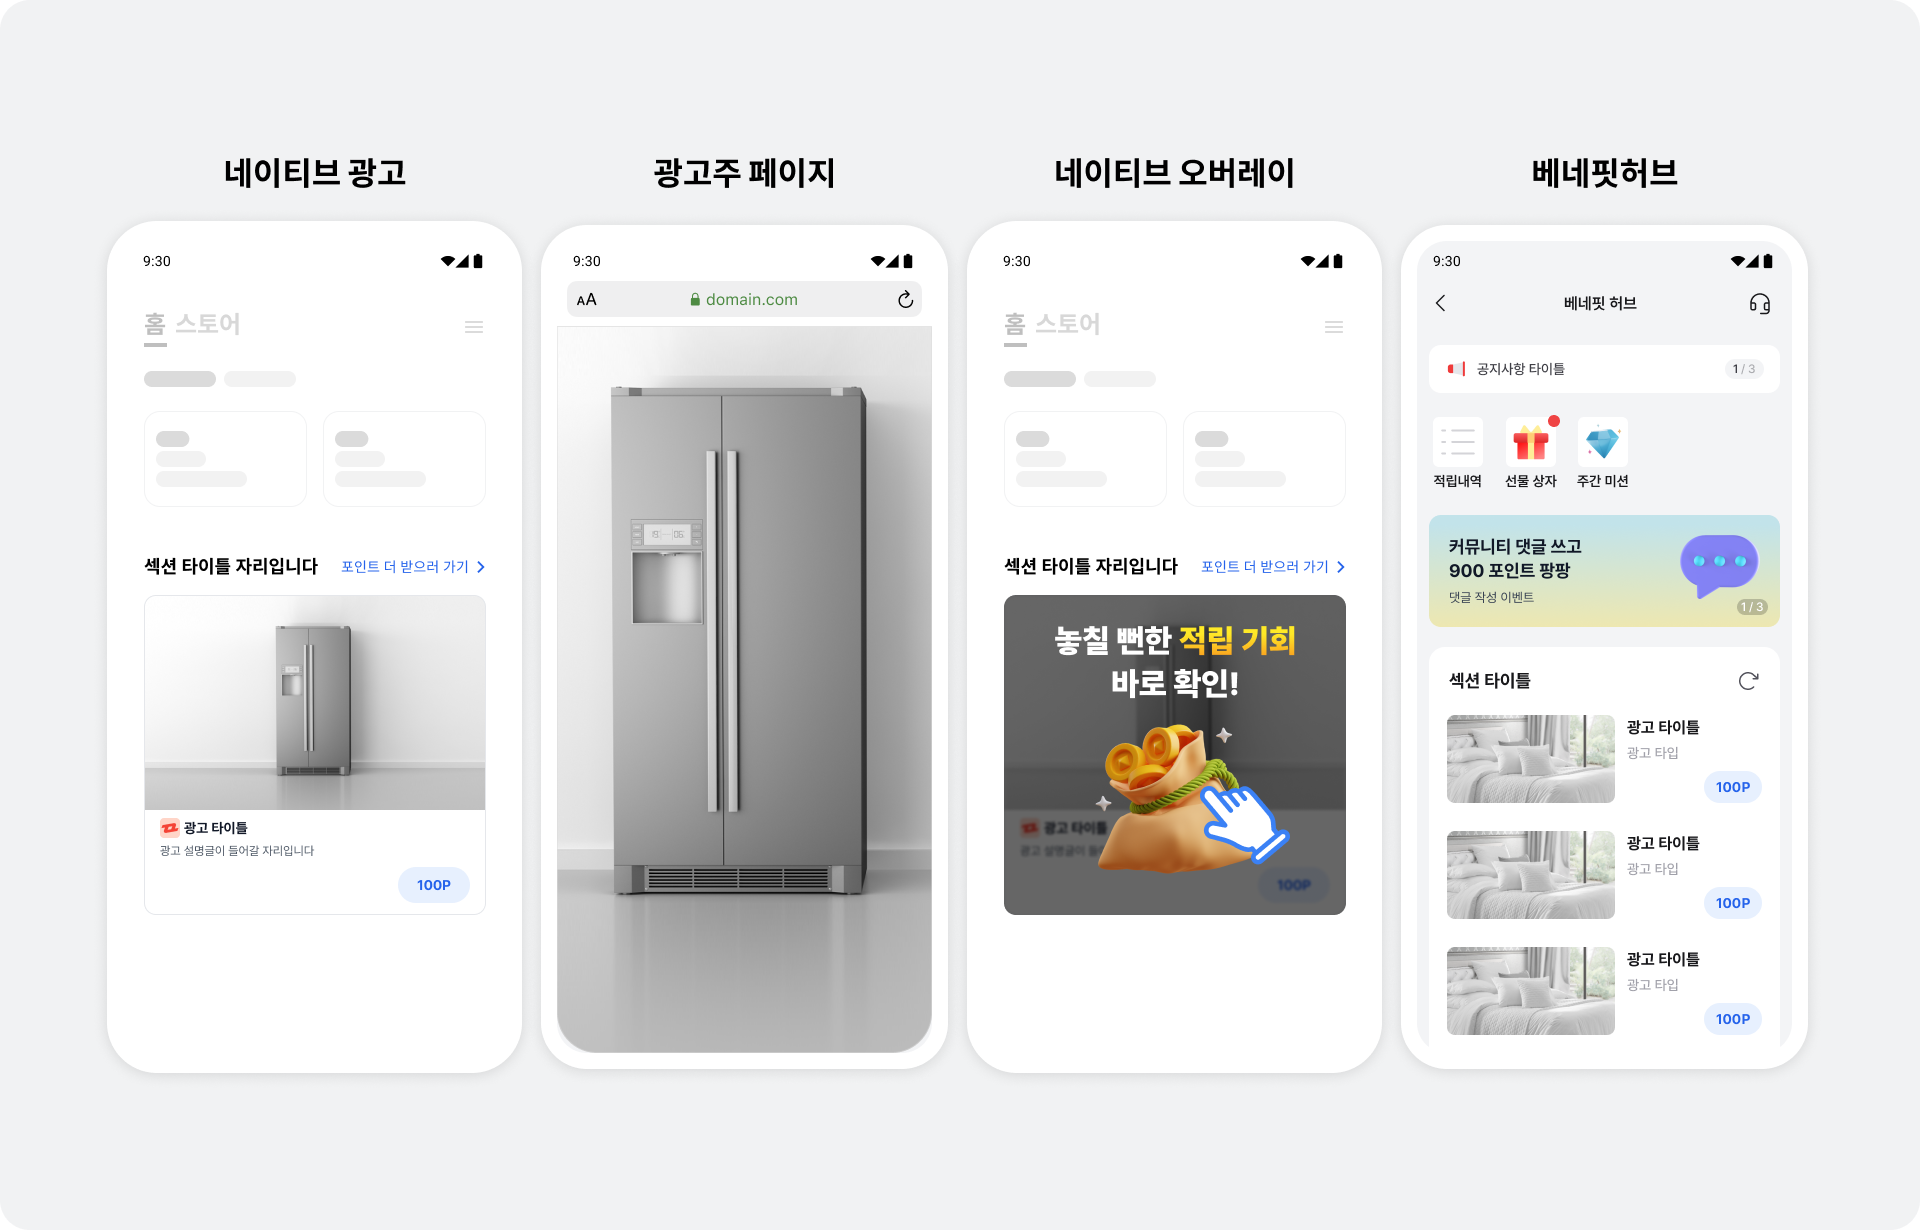 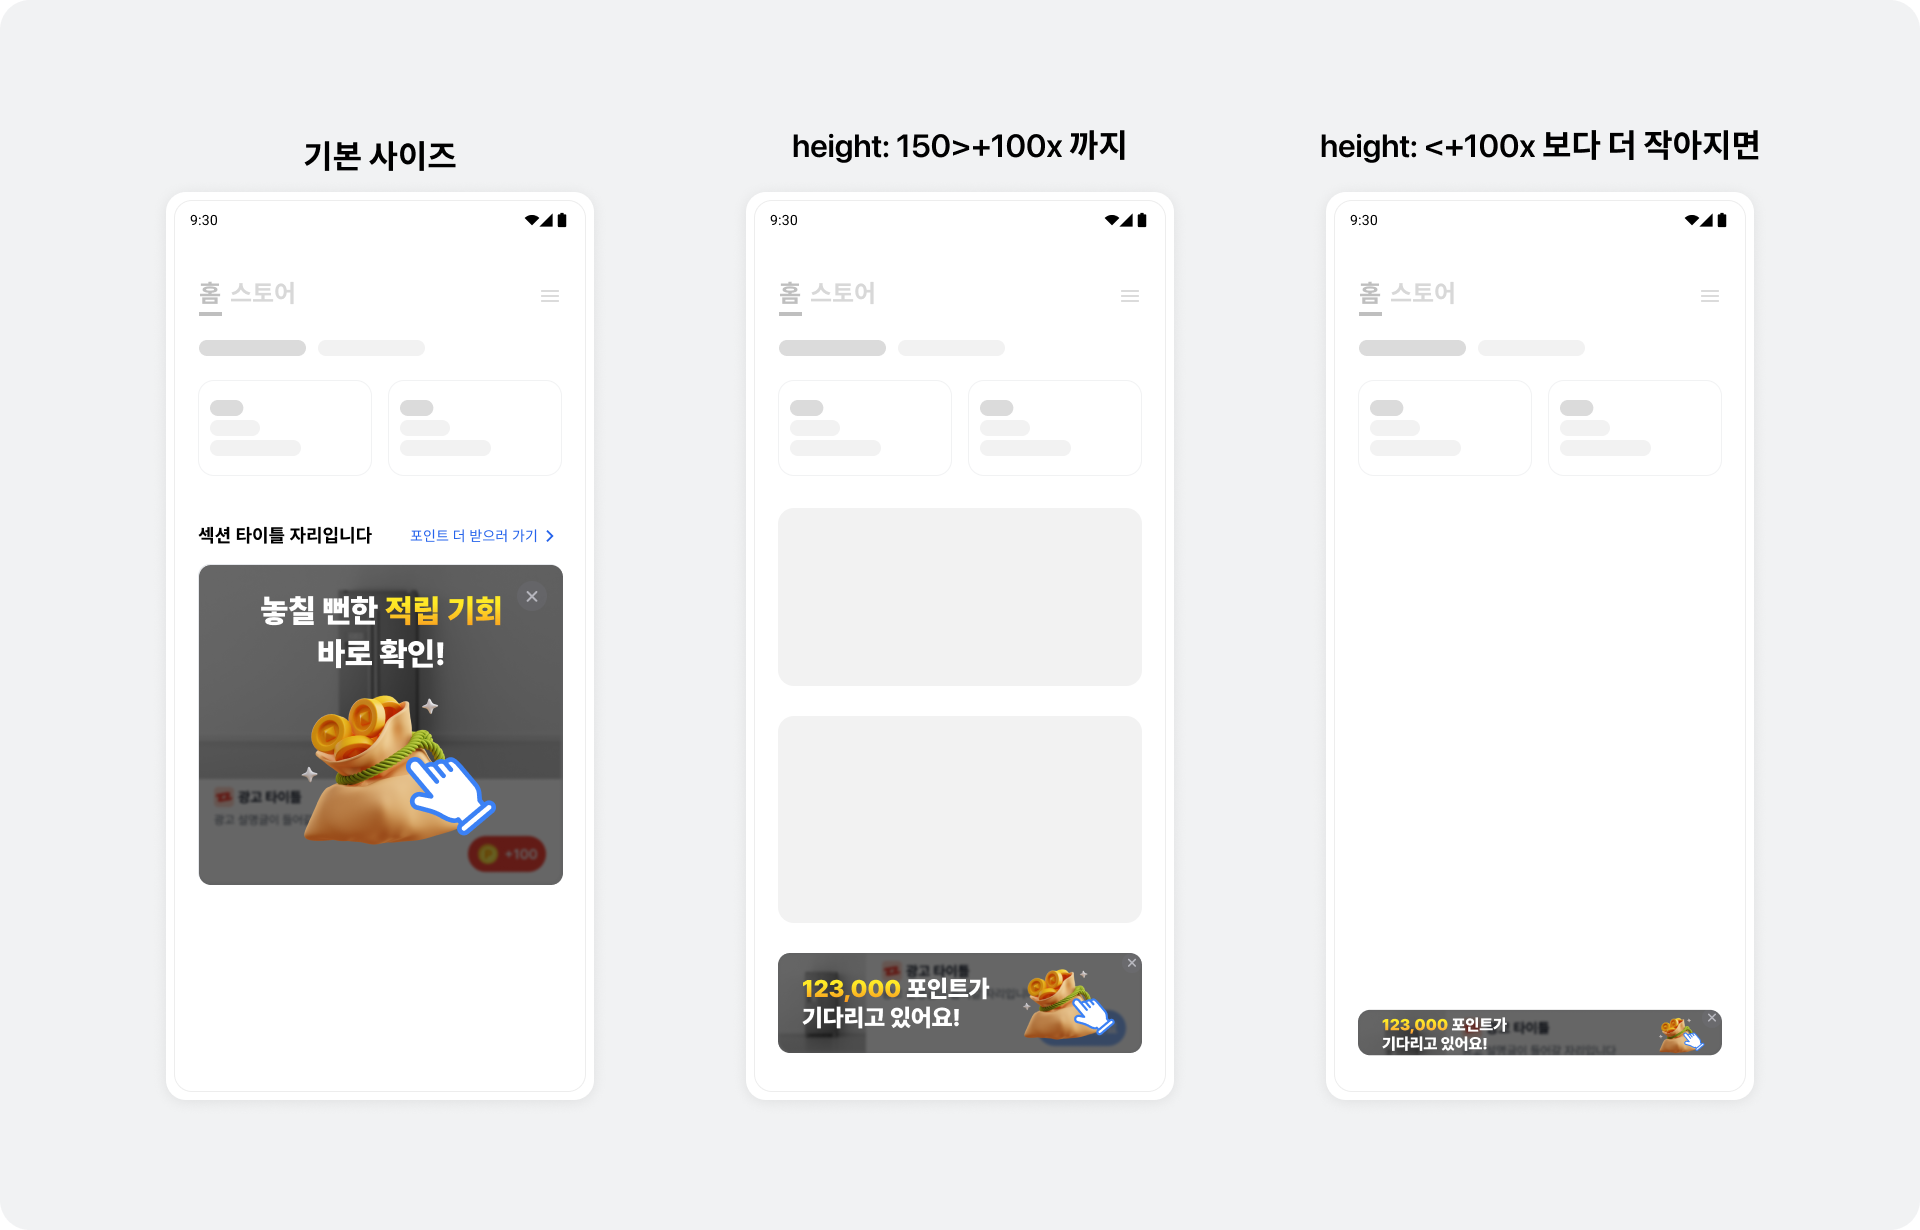
Overlay UIs adapt to the native placement's size. To increase BenefitHub entry rates, the overlay shows different ad or content product UIs based on the user's past participation and preferences.
### Register an ad event listener
> ✏️ **Note**\
> For reward results (`BuzzRewardResult`), see [Reward result types (`BuzzRewardResult`)](https://docs.buzzvil.com/en/docs/buzzbenefit-android/v6/native#%EB%A6%AC%EC%9B%8C%EB%93%9C-%EC%A0%81%EB%A6%BD-%EA%B2%B0%EA%B3%BCrewardresult-%EC%A2%85%EB%A5%98).
Receive ad callback events through `BuzzNativeAdEventsListener`. Register a listener on `BuzzNative` before calling `BuzzNativeViewBinder.bind()`.
> ❗️ **Caution**
>
> - Ad event listeners cannot receive impression or click events for the BenefitHub entry slide.
> - We recommend only logging and simple notifications. Other custom behavior may conflict with native features such as automatic ad refresh.
The following example registers an ad event listener on `BuzzNative`.
```kotlin
import com.buzzvil.buzzbenefit.buzznative.BuzzNativeAdEventsListener
import com.buzzvil.buzzbenefit.buzznative.BuzzRewardResult
import com.buzzvil.buzzbenefit.buzznative.BuzzNative
import com.buzzvil.buzzbenefit.buzznative.BuzzNativeAd
// (Optional) 광고 이벤트 리스너를 등록합니다.
// 로그 기록, 단순 알림 외에 다른 동작을 추가하는 것을 권장하지 않습니다. 직접 구현한 동작이 네이티브에서 제공하는 기능(광고 자동 갱신 등)과 충돌할 수 있습니다.
buzzNative.setAdEventsListener(object : BuzzNativeAdEventsListener {
override fun onImpressed(buzzNativeAd: BuzzNativeAd) {
// Native 광고가 유저에게 노출되었을 때 호출됩니다.
}
override fun onClicked(buzzNativeAd: BuzzNativeAd) {
// 유저가 Native 광고를 클릭했을 때 호출됩니다.
}
override fun onRewardRequested(buzzNativeAd: BuzzNativeAd) {
// 리워드 적립을 요청했을 때 호출됩니다.
}
override fun onParticipated(buzzNativeAd: BuzzNativeAd) {
// 유저가 광고 참여를 완료하였을 때 호출됩니다.
}
override fun onRewarded(buzzNativeAd: BuzzNativeAd, buzzRewardResult: BuzzRewardResult) {
// 리워드가 적립되었을 때 호출됩니다.
}
})
buzzNative.load(...)
```
#### Reward result types (`BuzzRewardResult`)
| `BuzzRewardResult` | Result | Description |
| --------------------------------------- | ------- | ------------------------------------------------------------------------------ |
| `SUCCESS` | Success | The reward was credited successfully. |
| `ALREADY_PARTICIPATED` | Failure | The reward for this ad has already been credited. |
| `MISSING_REWARD` | Failure | The ad has no reward. |
| `TOO_SHORT_TO_PARTICIPATE` | Failure | The user returned from the ad landing page too quickly. |
| `CONNECTION_TIMEOUT` | Failure | A network timeout occurred. |
| `CONNECTION_TIMEOUT_IN_POWER_SAVE_MODE` | Failure | A network timeout occurred because of the device's power-saving mode (`절전모드`). |
| `BROWSER_NOT_LAUNCHED` | Failure | The browser did not launch to display the ad landing page. |
| `REQUEST_ERROR` | Failure | The request is invalid. |
| `UNKNOWN_NETWORK_ERROR` | Failure | An unknown network error occurred. |
| `SERVER_ERROR` | Failure | An unknown server error occurred. |
| `CLIENT_ERROR` | Failure | An unknown client error occurred. |
| `UNKNOWN` | Failure | An unknown error occurred. |
- When a user enables power-saving mode (`절전모드`) on their device, background execution restrictions make rewards for click-based ads (CPC, CPM) likely to fail. Use `BuzzRewardResult.CONNECTION_TIMEOUT_IN_POWER_SAVE_MODE` to explain the failure to users who have enabled power-saving mode (`절전모드`).
## Implement a carousel
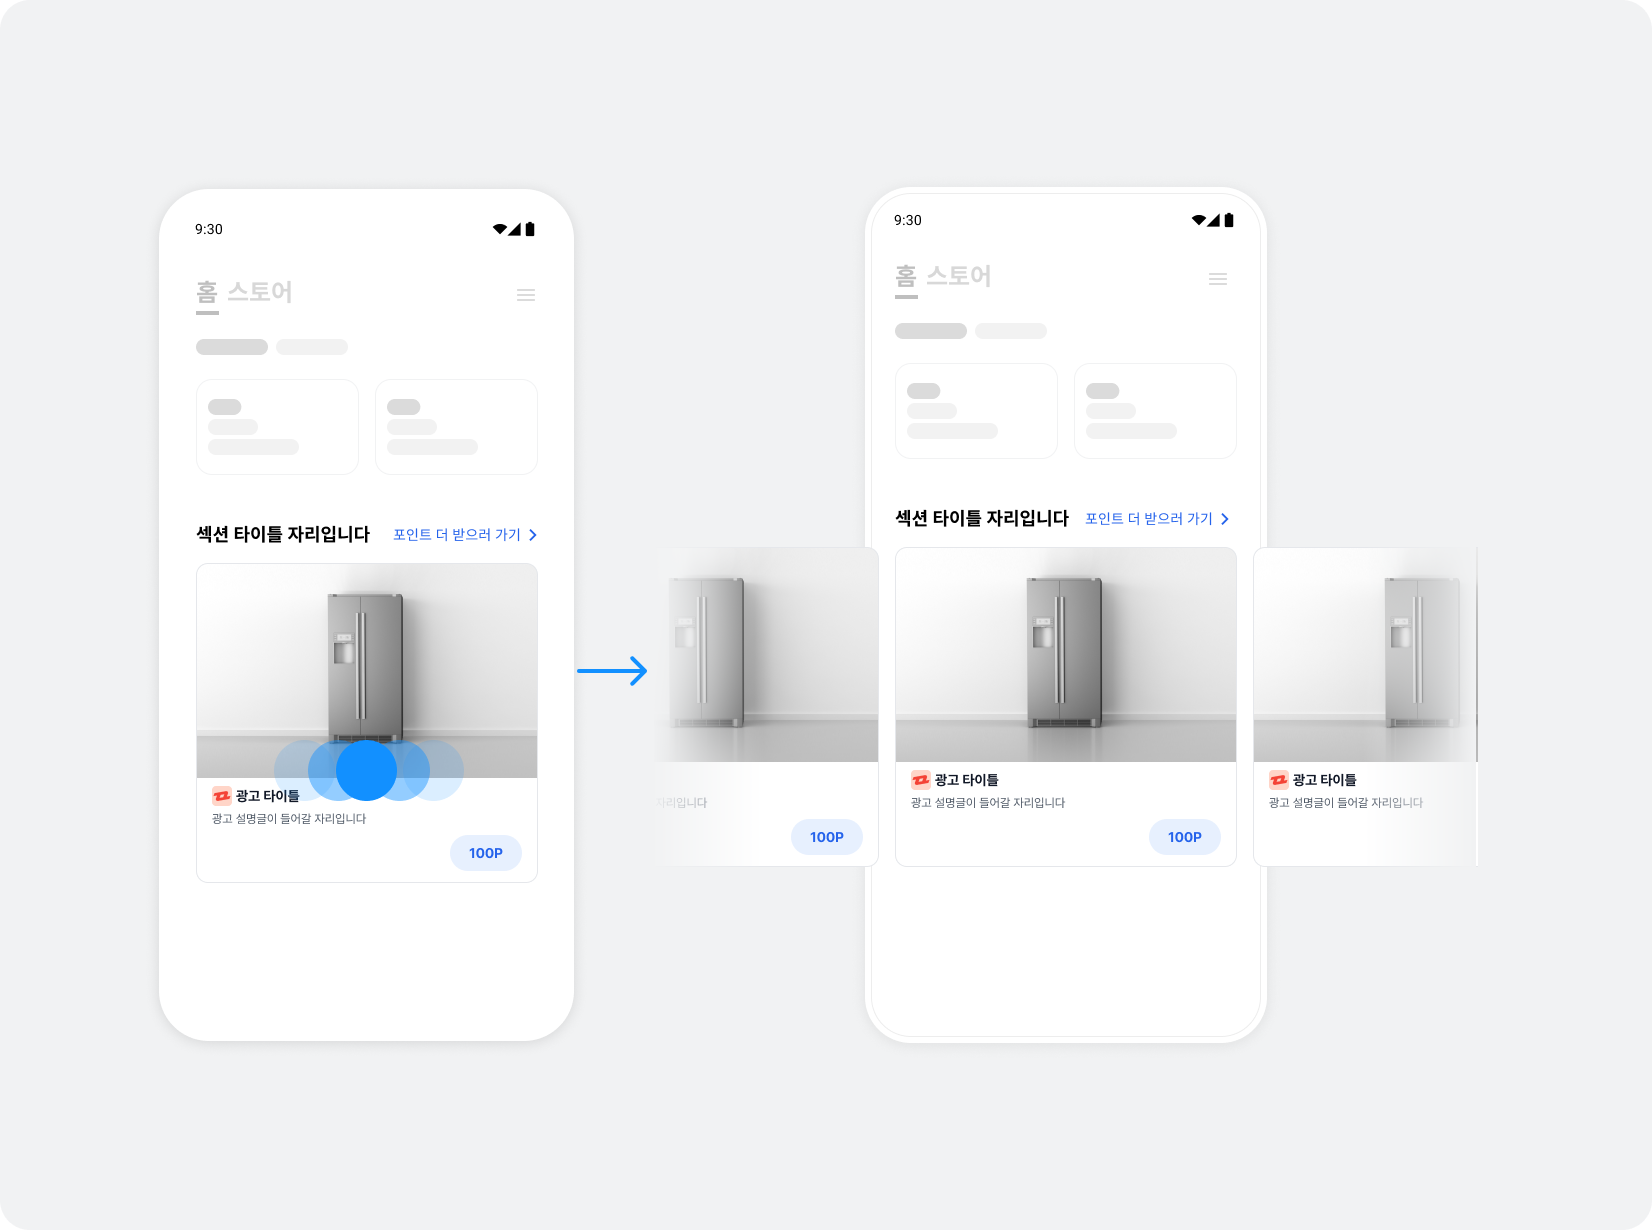
A carousel is a UI that displays multiple ads through horizontal scrolling. Use the Buzzvil SDK to create a carousel in a native placement and implement its required features. Optional features can further improve the user experience.
> ✏️ **Note**\
> For the complete code, see the [GitHub sample code](https://github.com/Buzzvil/buzz-sdk-samples/tree/master/buzzvil-sdk-v6-android).
### Implement basic carousel features
#### Step 1. Allocate ads
To allocate multiple ads in a native placement, use `BuzzNativeGroup`, which controls duplicate ad allocation. Create a `BuzzNativeGroup` object using `YOUR_NATIVE_ID`. Dispose of `BuzzNativeGroup` when the screen is destroyed.
Call `BuzzNativeGroup.load()` to check how many ads can currently be allocated.
> ✏️ **Note**
>
> - You can request up to 10 ads.
> - `onSuccess()` is called when at least one ad is allocated. The number successfully allocated may be smaller than the number requested.
> - If the initial allocation request fails, `onFailure()` is called and no ad appears. For details about the `BuzzAdError` error code for failed allocation, see [An error code appears](https://docs.buzzvil.com/en/docs/buzzbenefit-android/v6/troubleshooting#%EC%98%A4%EB%A5%98-%EC%BD%94%EB%93%9C%EA%B0%80-%EB%82%98%ED%83%80%EB%82%A9%EB%8B%88%EB%8B%A4).
```kotlin
import com.buzzvil.buzzbenefit.BuzzAdError
import com.buzzvil.buzzbenefit.buzznative.BuzzNativeGroup
// 캐러셀 광고에서 광고 중복 할당을 방지하기 위한 BuzzNativeGroup 인스턴스입니다.
// Fragment의 생명 주기에 맞추어 생성 및 해제하세요.
private var buzzNativeGroup: BuzzNativeGroup? = null
private fun initCarouselNativeGroup() {
// 광고 중복 할당을 막기 위해 하나의 캐러셀에 하나의 BuzzNativeGroup 인스턴스를 생성하여 사용합니다.
buzzNativeGroup = BuzzNativeGroup(YOUR_NATIVE_UNIT_ID)
val REQUEST_AD_COUNT = 5
// 현재 할당 받을 수 있는 광고의 갯수를 확인합니다.
buzzNativeGroup?.let {
it.load(
REQUEST_AD_COUNT,
onSuccess = { adCount ->
// TODO 할당 받은 광고 갯수(adCount)만큼 아이템 리스트를 만들어 RecyclerView 어댑터를 초기화 합니다.
},
onFailure = { adError ->
// TODO 광고 레이아웃을 숨김 처리 하는 등 적절한 에러 처리를 할 수 있습니다.
}
)
}
}
override fun onDestroyView() {
super.onDestroyView()
buzzNativeGroup?.dispose()
}
```
#### Step 2. Create a RecyclerView
Use `RecyclerView` to lay out item views horizontally and an adapter to manage them, creating a carousel in a native placement with the Buzzvil SDK. Follow these steps to create `RecyclerView`.
1. Add `RecyclerView` where you want the carousel.
```xml
```
2. Define a layout for each item of `RecyclerView` in the view layout file (`your_native_ad_view.xml`).
> ✏️ **Note**\
> \> You can reuse the `BuzzNativeAdView` layout from the basic native integration. See the [GitHub sample code](https://github.com/Buzzvil/buzz-sdk-samples/tree/master/buzzvil-sdk-v6-android).
````
```xml
...
```
````
#### Step 3. Implement the RecyclerView adapter
Follow these steps to implement the RecyclerView adapter and ViewHolder.
1. Implement `BuzzNativeCarouselViewHolder` to bind BuzzNative.
```kotlin
import com.buzzvil.buzzbenefit.buzznative.BuzzNative
import com.buzzvil.buzzbenefit.buzznative.BuzzNativeViewBinder
class BuzzNativeCarouselViewHolder(
binding: BuzzNativeAdViewBinding
) : RecyclerView.ViewHolder(binding.root) {
private val buzzNativeViewBinder: BuzzNativeViewBinder
init {
val buzzNativeAdView = binding.buzzNativeAdView
val buzzMediaView = binding.buzzMediaView
val titleTextView = binding.textTitle
val descriptionTextView = binding.textDescription
val iconImageView = binding.imageIcon
val buzzCtaView = binding.buzzCtaView
// BuzzNativeView와 하위 컴포넌트를 바인드합니다.
buzzNativeViewBinder = BuzzNativeViewBinder.Builder()
.buzzNativeAdView(buzzNativeAdView)
.buzzMediaView(buzzMediaView)
.titleTextView(titleTextView)
.descriptionTextView(descriptionTextView)
.iconImageView(iconImageView)
.buzzCtaView(buzzCtaView)
.build()
}
fun bind(native: BuzzNative) {
// BuzzNativeViewBinder의 bind()를 호출하면 광고 갱신이 자동으로 수행됩니다.
// (Optional) BuzzNativeRefreshEventsListener, BuzzNativeAdEventsListener를 bind 하기 전 연결해야 합니다.
buzzNativeViewBinder.bind(native)
}
fun unbind() {
// unbind를 반드시 호출하여 뷰를 재사용할 때 문제가 발생하지 않게 합니다.
buzzNativeViewBinder.unbind()
}
}
```
2. Implement an adapter (`BuzzNativeCarouselAdapter`) to manage the carousel.
> ❗️ **Caution**\
> \> Always release `BuzzNativeAdView` in `onViewRecycled()` so ad state does not become mixed across views. Call `BuzzNativeViewBinder.unbind()` through `unbind()` declared in `BuzzNativeCarouselViewHolder`.
````
```kotlin
import androidx.recyclerview.widget.RecyclerView
import com.buzzvil.buzzbenefit.buzznative.BuzzNative
class BuzzNativeCarouselAdapter(
private val list: List
) : RecyclerView.Adapter() {
override fun onCreateViewHolder(parent: ViewGroup, viewType: Int): BuzzNativeCarouselViewHolder {
val inflater = parent.context.getSystemService(Context.LAYOUT_INFLATER_SERVICE) as LayoutInflater
val binding = BuzzNativeAdViewBinding.inflate(inflater, parent, false)
return BuzzNativeCarouselViewHolder(binding)
}
override fun getItemCount(): Int {
return list.size
}
override fun onBindViewHolder(holder: BuzzNativeCarouselViewHolder, position: Int) {
val item = list[position]
holder.bind(item)
}
override fun onViewRecycled(holder: BuzzNativeCarouselViewHolder) {
super.onViewRecycled(holder)
// unbind를 반드시 호출하여 뷰를 재사용할 때 문제가 발생하지 않게 합니다.
holder.unbind()
}
}
```
````
#### Step 4. Attach to an activity or fragment
The following example creates the `BuzzNativeCarouselAdapter` implemented above in an activity (`BuzzNativeCarouselActivity`).
1. Implement `buildCarouselItems()` to create an item list whose size equals the number of allocated ads (`adCount`).
2. Create `BuzzNativeCarouselAdapter` in `BuzzNativeGroup.load(onSuccess)` and set it on the RecyclerView.
The following is an example implementation of `BuzzNativeCarouselActivity`.
```kotlin
import com.buzzvil.buzzbenefit.BuzzAdError
import com.buzzvil.buzzbenefit.buzznative.BuzzNative
import com.buzzvil.buzzbenefit.buzznative.BuzzNativeGroup
private var buzzNativeGroup: BuzzNativeGroup? = null
private fun initCarouselNativeGroup(nativeUnitId: String) {
// 광고 중복 할당을 막기 위해 하나의 캐러셀에 하나의 BuzzNativeGroup 인스턴스를 생성하여 사용합니다.
buzzNativeGroup = BuzzNativeGroup(nativeUnitId)
val REQUEST_AD_COUNT = 5
// 현재 할당 받을 수 있는 광고의 갯수를 확인합니다.
buzzNativeGroup?.let {
it.load(
REQUEST_AD_COUNT,
onSuccess = { adCount ->
// 어댑터를 초기화 합니다.
initCarouselAdapter(it.natives, adCount)
},
onFailure = { adError ->
// TODO 광고 레이아웃을 숨김 처리 하는 등 적절한 에러 처리를 할 수 있습니다.
}
)
}
}
private fun initCarouselAdapter(natives: List, adCount: Int) {
// 할당 받은 광고 리스트로 BuzzNativeCarouselAdapter를 생성합니다.
val adapter = BuzzNativeCarouselAdapter(natives)
// RecyclerView에 어댑터를 설정합니다.
binding.carouselRecyclerView.adapter = adapter
}
```
Run the app to see the carousel in action. Then complete the integration by following [Implement required carousel features](https://docs.buzzvil.com/en/docs/buzzbenefit-android/v6/native#%EC%BA%90%EB%9F%AC%EC%85%80%EC%9D%98-%ED%95%84%EC%88%98-%EA%B8%B0%EB%8A%A5-%EA%B5%AC%ED%98%84%ED%95%98%EA%B8%B0) below.
### Implement required carousel features
The Buzzvil SDK provides a slide page and entry point into BenefitHub, where users can find a variety of ads and filter them to suit their preferences.
> ✅ **Important**\
> If you already integrate BenefitHub or plan to do so, you must implement its entry point to maximize the value of the SDK integration.
#### BenefitHub entry point
Implement an entry point above or below the carousel so users can open BenefitHub from it.
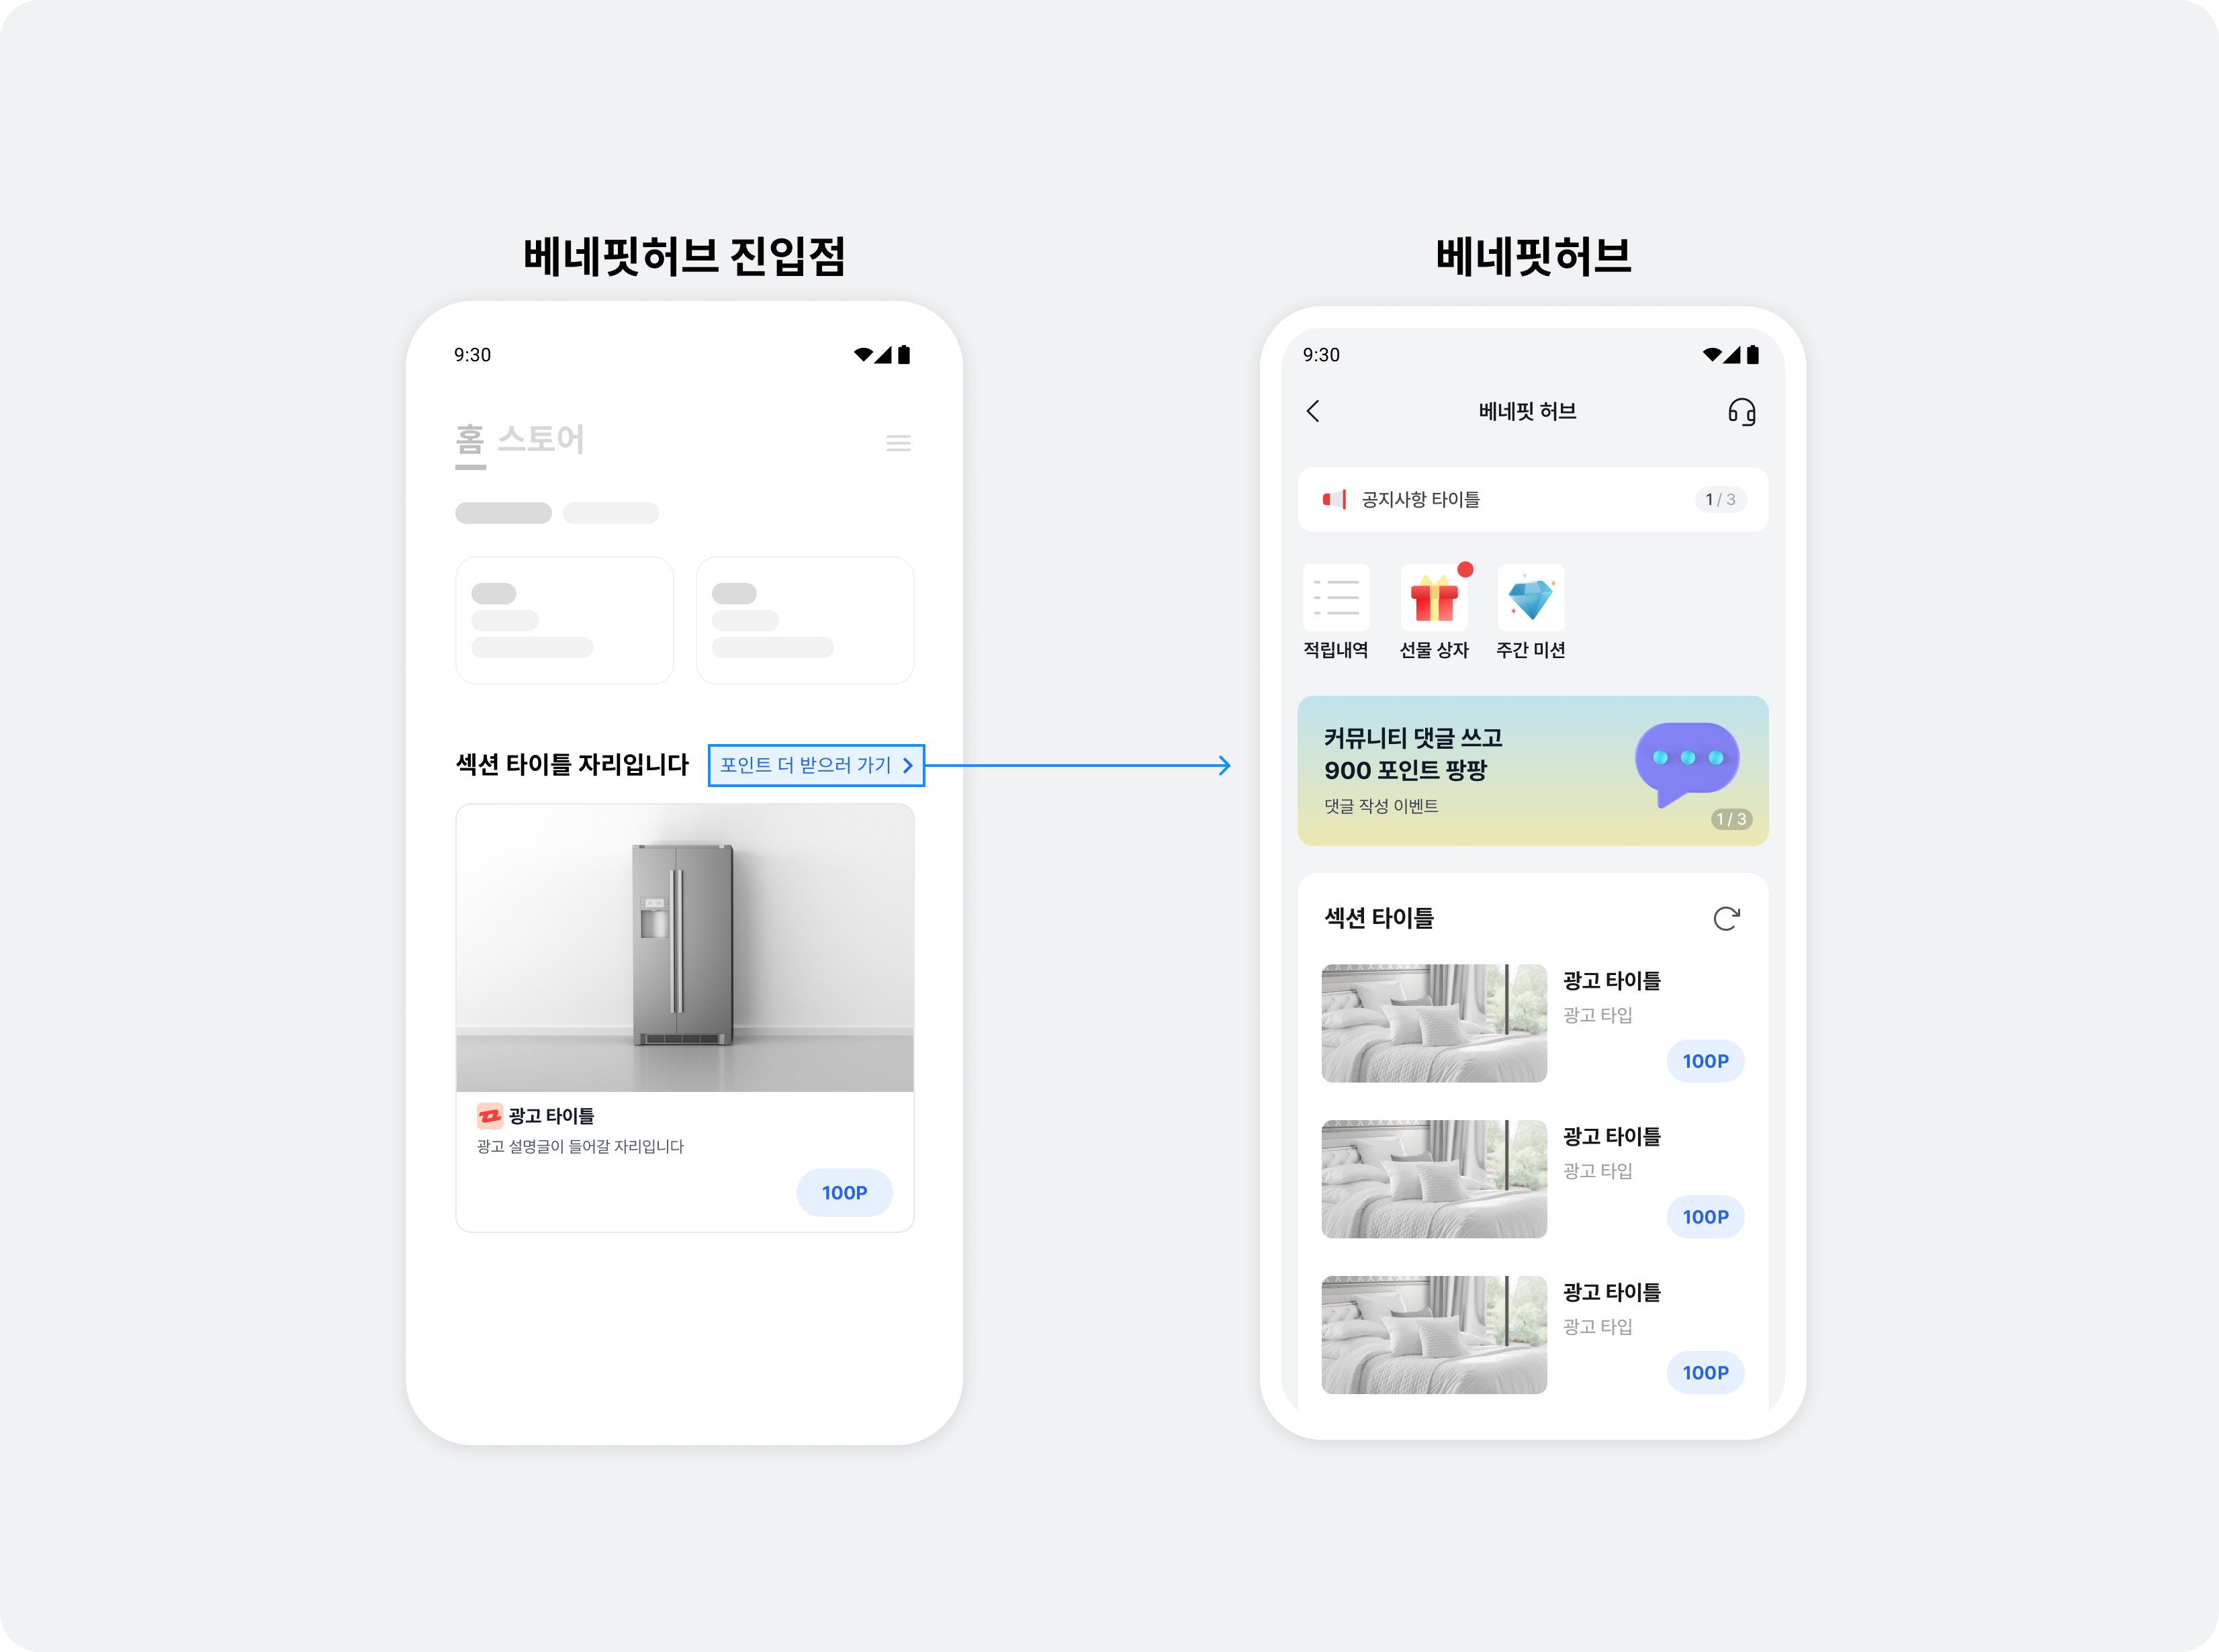
Follow these steps to implement the BenefitHub entry point.
1. Add a layout below the RecyclerView used for the carousel.
The complete code for `activity_native_ad2_carousel.xml` is available in the [GitHub sample code](https://github.com/Buzzvil/buzz-sdk-samples/tree/master/buzzvil-sdk-v6-android).
```xml
```
2. Set the visibility of the BenefitHub entry point according to the ad allocation response.
- Show the carousel and BenefitHub entry point when there are ads to display.
- Hide the carousel and BenefitHub entry point while ads have not yet loaded, if an error occurs, or if there are no ads.
The following example changes the visibility of `RecyclerView` (the carousel) and `carouselToFeedLink` in `BuzzNativeCarouselActivity` according to whether the allocation request succeeded.
```kotlin
import com.buzzvil.buzzbenefit.BuzzAdError
import com.buzzvil.buzzbenefit.buzznative.BuzzNativeGroup
private fun initCarouselNativeGroup(nativeUnitId: String) {
// 광고 중복 할당을 막기 위해 하나의 캐러셀에 하나의 BuzzNativeGroup 인스턴스를 생성하여 사용합니다.
buzzNativeGroup = BuzzNativeGroup(nativeUnitId)
val REQUEST_AD_COUNT = 5
// 현재 할당 받을 수 있는 광고의 갯수를 확인합니다.
buzzNativeGroup?.let {
it.load(
REQUEST_AD_COUNT,
onSuccess = { adCount ->
// 어댑터를 초기화 합니다.
initCarouselAdapter(it.natives, adCount, nativeUnitId)
binding.carouselRecyclerView.visibility = View.VISIBLE
binding.carouselToFeedLink.visibility = View.VISIBLE
},
onFailure = { adError ->
// TODO 광고 레이아웃을 숨김 처리 하는 등 적절한 에러 처리를 할 수 있습니다.
binding.carouselRecyclerView.visibility = View.GONE
binding.carouselToFeedLink.visibility = View.GONE
}
)
}
}
```
3. Fix the position of the BenefitHub entry point.
Different lengths of ad description text (`textDescription`) can produce different line counts, making the entry point shift between slides. Set a fixed `lines` value on the description view to keep it in a consistent position.
The following example sets the description view's lines value to `2`.
```xml
```
4. Implement the BenefitHub entry point in code.
```kotlin
import com.buzzvil.buzzbenefit.benefithub.BuzzBenefitHub
val carousleToFeedLint: View = ...
carouselToFeedLink.setOnClickListener {
BuzzBenefitHub.show(context)
}
```
Run the app to see the BenefitHub entry slide on the last carousel page and the entry point below the carousel. Then see [Implement optional carousel features](https://docs.buzzvil.com/en/docs/buzzbenefit-android/v6/native#%EC%BA%90%EB%9F%AC%EC%85%80%EC%9D%98-%EB%B6%80%EA%B0%80-%EA%B8%B0%EB%8A%A5-%EA%B5%AC%ED%98%84%ED%95%98%EA%B8%B0) below to provide a user-friendly UI and UX.
### Implement optional carousel features
This section presents some of the ways you can add features to a carousel. Adapt the code to your needs.
> ✏️ **Note**\
> This document includes only the code needed for the explanations. For complete code, see the [GitHub sample code](https://github.com/Buzzvil/buzz-sdk-samples/tree/master/buzzvil-sdk-v6-android).
#### Implement infinite scrolling
You can implement an infinite loop that lets users scroll continuously through a finite set of carousel items. There are many approaches; this guide uses a simple method in which the adapter's `getItemCount()` returns a very large value.
Follow these steps to implement an infinite loop.
1. Modify the adapter (`BuzzNativeCarouselAdapter`) to accept the `isInfiniteLoopEnabled` parameter.
```kotlin
class BuzzNativeCarouselAdapter(
...
private val isInfiniteLoopEnabled: Boolean,
) : RecyclerView.Adapter() {
...
}
```
2. Change the implementation of `getItemCount()` in `BuzzNativeCarouselAdapter`. When using position, take the remainder after division by the list size to obtain the actual index.
- `getItemCount()`: To make the RecyclerView appear to have infinite data, return `Integer.MAX_VALUE` when `isInfiniteLoopEnabled` is `true` and there are items to display.
- `getItemPosition()`: Use the remainder of `position` divided by the list size to return the actual index.
```kotlin
class BuzzNativeCarouselAdapter(
private val list: List,
private val isInfiniteLoopEnabled: Boolean,
) : RecyclerView.Adapter() {
override fun onCreateViewHolder(parent: ViewGroup, viewType: Int): RecyclerView.ViewHolder {
val inflater = parent.context.getSystemService(Context.LAYOUT_INFLATER_SERVICE) as LayoutInflater
val binding = CarouselItemBinding.inflate(inflater, parent, false)
return BuzzNativeCarouselViewHolder(binding)
}
override fun getItemCount(): Int {
val actualItemCount = list.size
return if (isInfiniteLoopEnabled && actualItemCount > 0) {
// 무한 루프를 쉽게 구현하는 방법으로 매우 큰 수를 여기서 반환합니다.
Int.MAX_VALUE
} else actualItemCount
}
override fun onBindViewHolder(holder: BuzzNativeCarouselViewHolder, position: Int) {
// (무한 루프 구현 시) position 대신 itemPosition을 사용합니다.
val itemPosition = getItemPosition(position)
val item = list[itemPosition]
// 해당 position에 해당하는 buzzAdBenefitViewBinder가 carouselPool을 사용하도록 합니다.
holder.bind(item, itemPosition)
}
override fun onViewRecycled(holder: BuzzNativeCarouselViewHolder) {
super.onViewRecycled(holder)
holder.unbind()
}
private fun getItemPosition(position: Int): Int {
return if (isInfiniteLoopEnabled) {
position % list.size
} else {
position
}
}
}
```
3. Add `BuzzNativeCarouselAdapter(isInfiniteLoopEnabled)` to the activity (`BuzzNativeCarouselActivity`).
```kotlin
import com.buzzvil.buzzbenefit.buzznative.BuzzNative
private fun initCarouselAdapter(natives: List, adCount: Int) {
// 무한 스크롤을 적용합니다.
val isInfiniteLoopEnabled = true
// 할당 받은 광고 리스트로 BuzzNativeCarouselAdapter를 생성합니다.
val adapter = BuzzNativeCarouselAdapter(natives, isInfiniteLoopEnabled)
// RecyclerView에 어댑터를 설정합니다.
binding.carouselRecyclerView.adapter = adapter
if (isInfiniteLoopEnabled) {
// 적당히 큰 수의 position으로 이동하여 무한 스크롤 효과를 구현합니다.
binding.carouselRecyclerView.layoutManager?.scrollToPosition(adCount * 10000)
}
}
```
#### Implement a loading screen
Use `setRefreshEventsListener` to show a loading screen during refreshes after ad participation, visually indicating network request delays.
> ✏️ **Note**\
> RecyclerView recycling can leave a loading view visible. Initialize it appropriately in each item type's `bind()`.
```kotlin
import com.buzzvil.buzzbenefit.BuzzAdError
import com.buzzvil.buzzbenefit.buzznative.BuzzNative
import com.buzzvil.buzzbenefit.buzznative.BuzzNativeRefreshEventsListener
class BuzzNativeCarouselViewHolder(
private val binding: CarouselItemBinding
) : RecyclerView.ViewHolder(binding.root) {
...
init {
...
}
...
fun bind(native: BuzzNative) {
...
native.setRefreshEventsListener(
object : BuzzNativeRefreshEventsListener {
override fun onSuccess(buzzNativeAd: BuzzNativeAd) {
setLoadingView(false)
}
override fun onFailure(adError: BuzzAdError) {
setLoadingView(false)
}
override fun onRequest() {
setLoadingView(true)
}
}
)
...
buzzNativeViewBinder.bind(native)
}
private fun setLoadingView(isLoading: Boolean) {
if (isLoading) {
binding.loadingView.visibility = View.VISIBLE
} else {
binding.loadingView.visibility = View.GONE
}
}
}
```
#### Register an ad event listener
Record when carousel ad events occur, such as impressions and clicks, to understand user behavior.
> ✏️ **Note**\
> For reward results (`RewardResult`), see [Reward result types (`RewardResult`)](https://docs.buzzvil.com/en/docs/buzzbenefit-android/v6/native#%EB%A6%AC%EC%9B%8C%EB%93%9C-%EC%A0%81%EB%A6%BD-%EA%B2%B0%EA%B3%BCrewardresult-%EC%A2%85%EB%A5%98).
> ❗️ **Caution**
>
> - Ad event listeners cannot receive impression or click events for the BenefitHub entry slide.
> - We recommend only logging and simple notifications. Other custom behavior may conflict with native features such as automatic ad refresh.
```kotlin
import com.buzzvil.buzzbenefit.buzznative.BuzzNative
import com.buzzvil.buzzbenefit.buzznative.BuzzNativeAd
import com.buzzvil.buzzbenefit.buzznative.BuzzNativeAdEventsListener
import com.buzzvil.buzzbenefit.buzznative.BuzzRewardResult
class BuzzNativeCarouselViewHolder(
private val binding: CarouselItemBinding
) : RecyclerView.ViewHolder(binding.root) {
private val buzzNativeViewBinder: BuzzNativeViewBinder
...
init {
...
}
...
fun bind(native: BuzzNative) {
...
native.setAdEventsListener(object : BuzzNativeAdEventsListener {
override fun onClicked(buzzNativeAd: BuzzNativeAd) {}
override fun onImpressed(buzzNativeAd: BuzzNativeAd) {}
override fun onParticipated(buzzNativeAd: BuzzNativeAd) {}
override fun onRewardRequested(buzzNativeAd: BuzzNativeAd) {}
override fun onRewarded(buzzNativeAd: BuzzNativeAd, buzzRewardResult: BuzzRewardResult) {}
})
...
buzzNativeViewBinder.bind(native)
}
}
```
#### Partially show adjacent ad items
Use RecyclerView's `padding` and `clipToPadding` properties to reduce item sizes and partially show the previous and next ads, encouraging users to scroll.
```xml
```
#### Set spacing between ad items
There are several ways to set spacing between ad items in a RecyclerView. This guide uses `ItemDecoration`. Follow these steps.
1. Implement `PaddingDividerDecoration` by extending `RecyclerView.ItemDecoration`.
```kotlin
class PaddingDividerDecoration(private val paddingDp: Int) : RecyclerView.ItemDecoration() {
override fun getItemOffsets(outRect: Rect, view: View, parent: RecyclerView, state: RecyclerView.State) {
super.getItemOffsets(outRect, view, parent, state)
// 여백을 한 쪽만 설정하면 PagerSnapHelper가 약간 어긋나게 동작하므로, 양쪽에 동일하게 여백을 넣습니다.
val paddingPx = paddingDp.dpToPx() / 2
outRect.left = paddingPx
outRect.right = paddingPx
}
private fun Int.dpToPx(): Int {
return (this * Resources.getSystem().displayMetrics.density).toInt()
}
}
```
2. Add `PaddingDividerDecoration` to the RecyclerView.
```kotlin
import com.buzzvil.buzzbenefit.buzznative.BuzzNative
private fun initCarouselAdapter(natives: List, adCount: Int) {
...
// 양 옆 여백 설정
binding.carouselRecyclerView.addItemDecoration(PaddingDividerDecoration(16))
...
}
```
## Frequently asked questions
| Question | Answer |
| ---------------------------------------------------------- | ------------------------------------------------------------------------------------------------------------------------------------------------------------------------------------------------------------------------------------------------------------------------------------------------------------------------------------------------------------------ |
| Why must I add a user support button for action-based ads? | If you allocate action-based ads, you must implement user support to operate the service reliably. See [Add user support for action-based ads](https://docs.buzzvil.com/en/docs/buzzbenefit-android/v6/faq#%EC%95%A1%EC%85%98%ED%98%95-%EA%B4%91%EA%B3%A0%EC%9D%98-%EC%9C%A0%EC%A0%80-%EB%AC%B8%EC%9D%98-%EA%B8%B0%EB%8A%A5-%EC%B6%94%EA%B0%80%ED%95%98%EA%B8%B0). |