네이티브(Native)
네이티브를 추가하고 설정하고 SDK 인터페이스를 사용해 부가 기능을 구현하는 방법을 알아보세요.
주요 특징
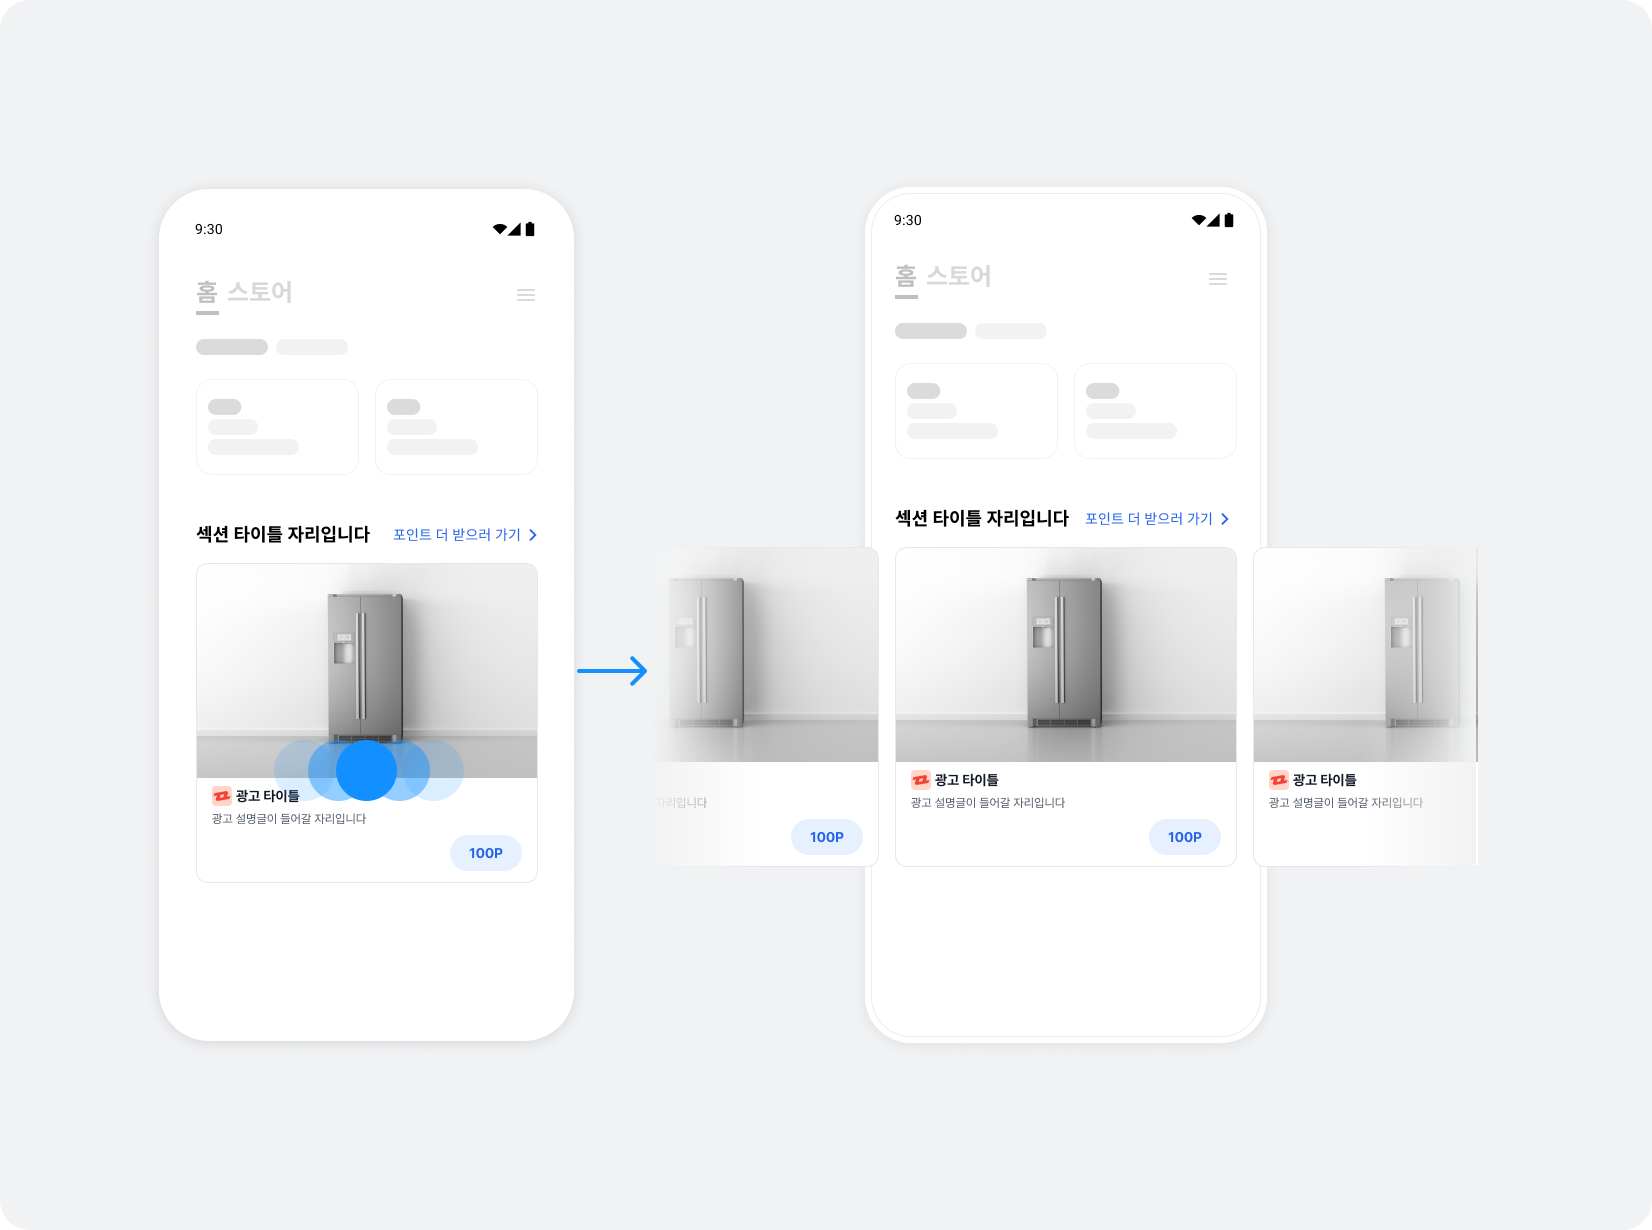
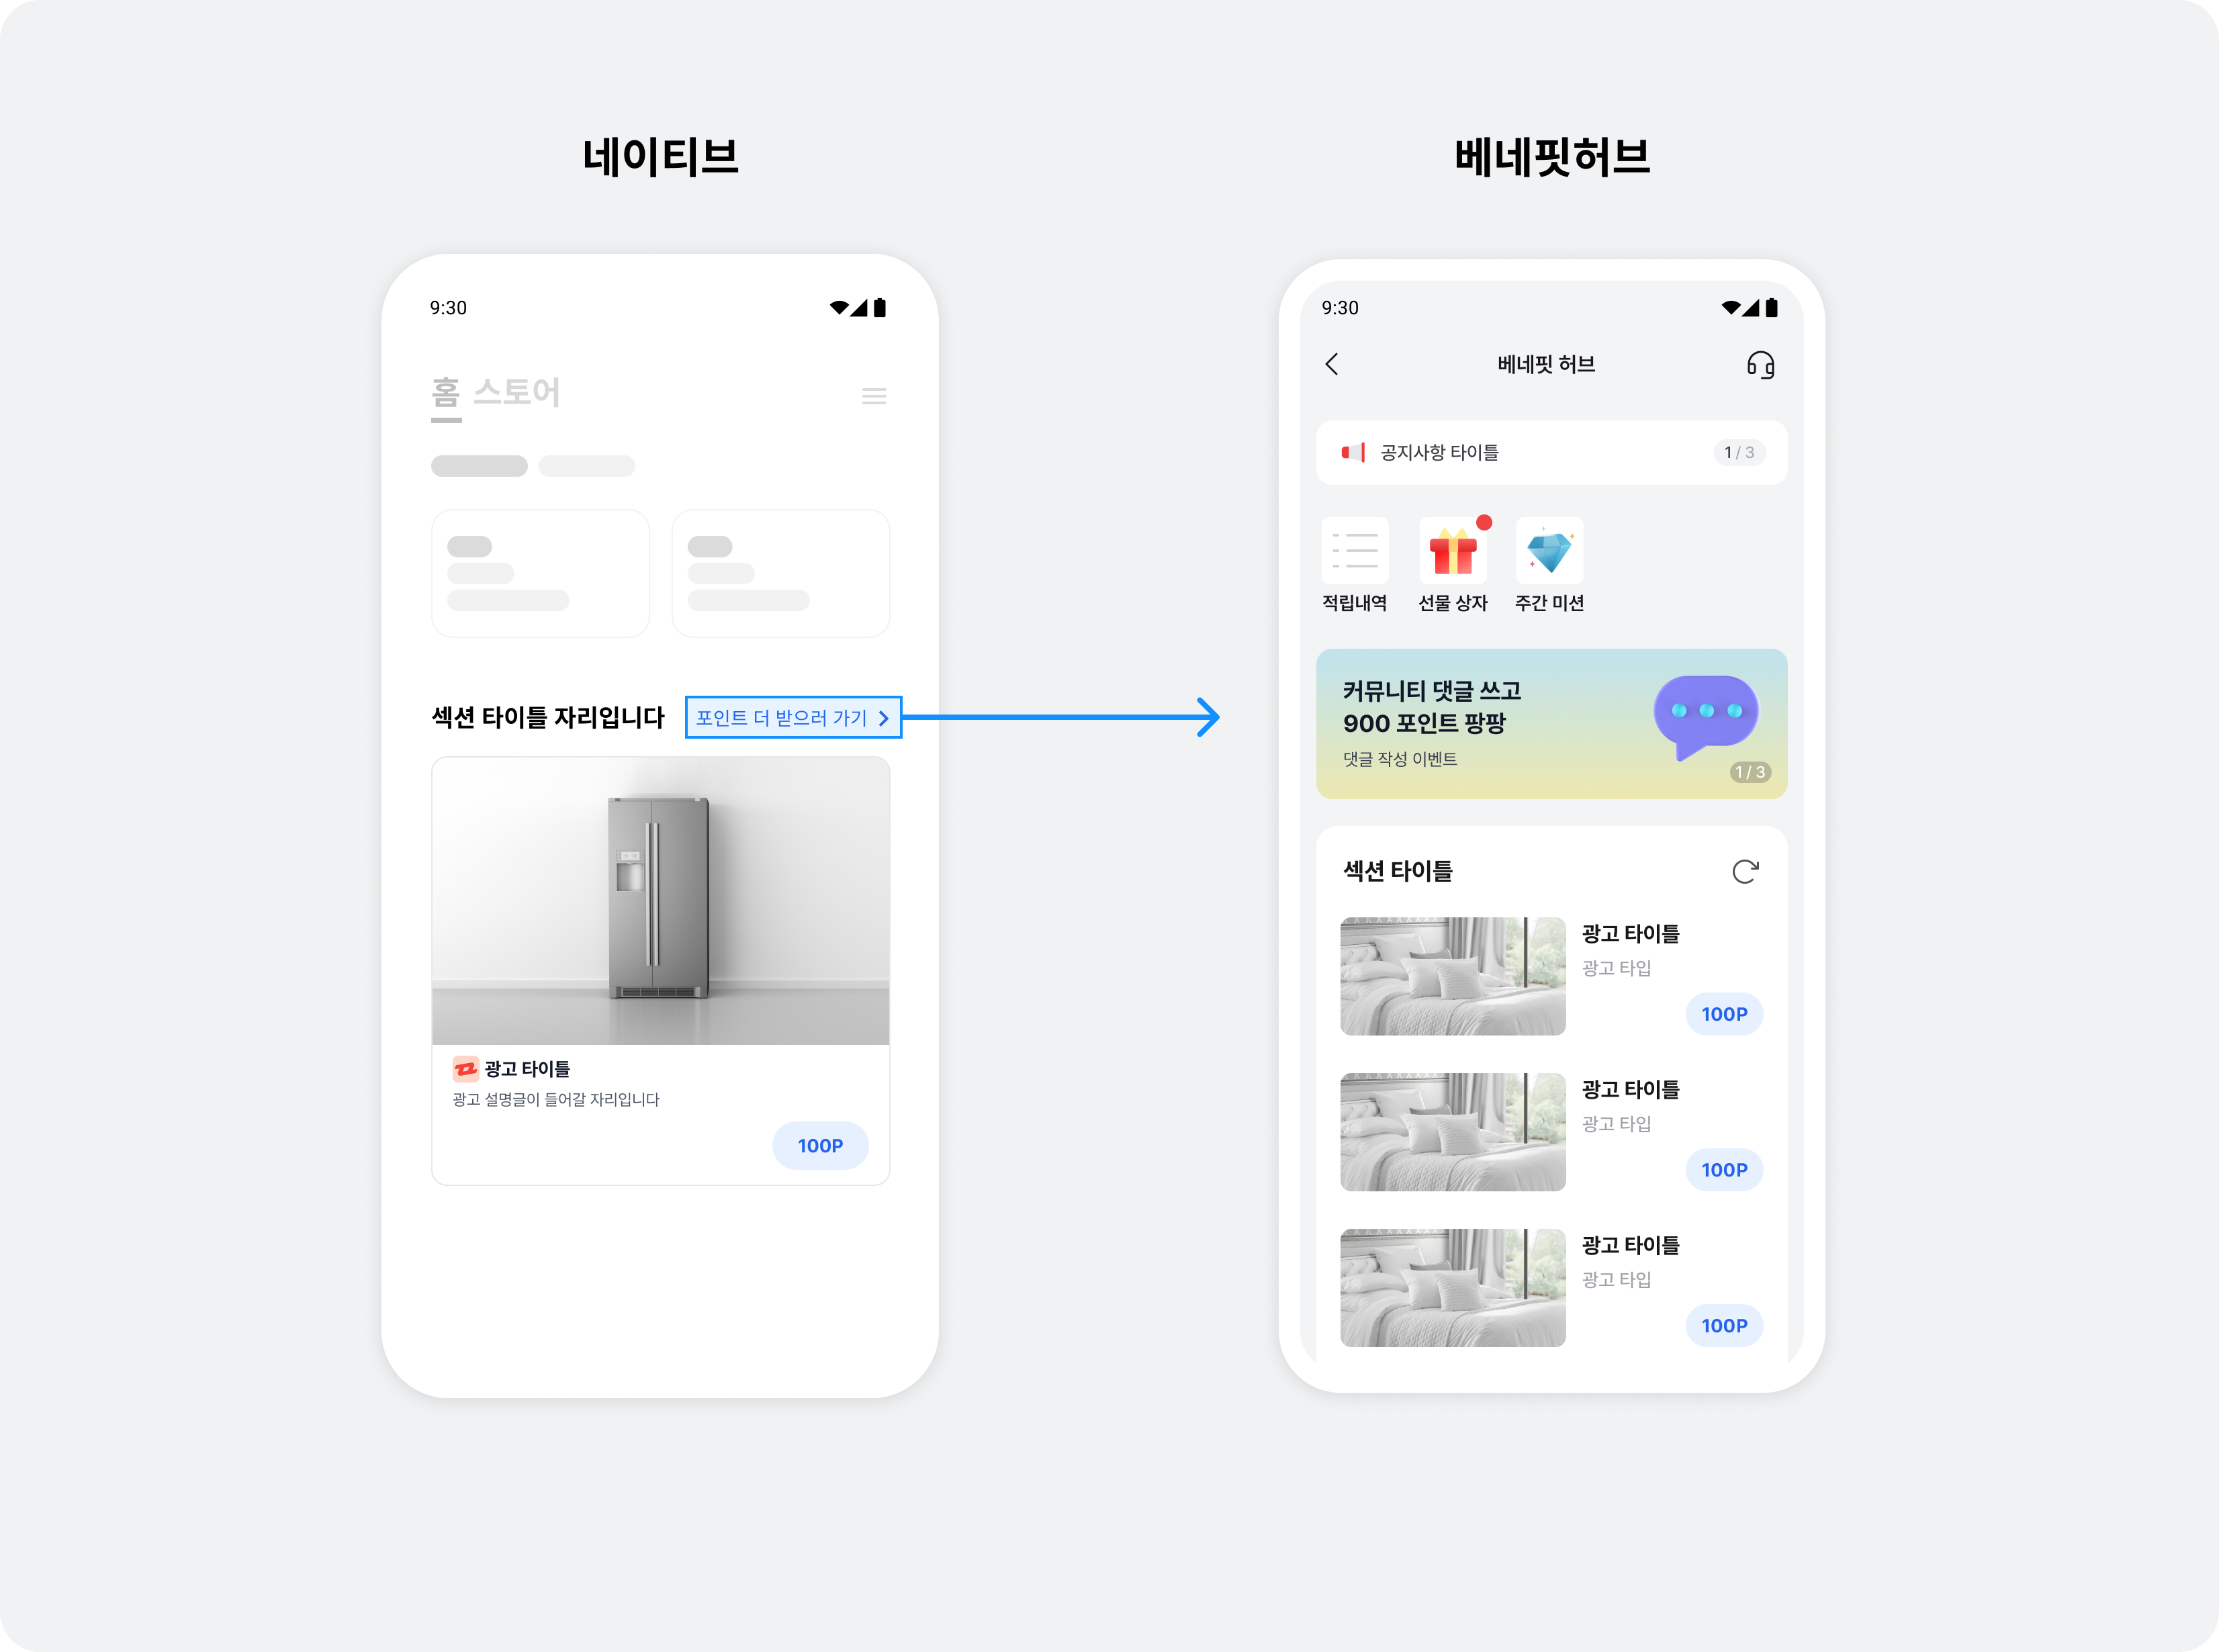
Buzzvil SDK가 제공하는 네이티브는 앱 화면과 자연스럽게 임베드되는 앱 맞춤형 광고를 게재할 수 있는 인벤토리입니다. 또한 유저가 광고에 참여한 후 자동으로 다음 광고를 노출하여, 하나의 네이티브 지면에서 끊임없이 광고를 송출하여 앱 수익화를 가속할 수 있도록 진화된 기능입니다. 유저가 더 많은 광고에 참여할 수 있도록 유도하는 다이나믹한 기능들도 제공합니다.
연동
앱에 네이티브를 연동하는 방법을 확인해 보세요.
1 단계. 준비하기
- 시작하기 적용 완료
- 네이티브 지면에 사용할 Unit ID (이하
YOUR_NATIVE_UNIT_ID)
2 단계. 광고 레이아웃 구성하기
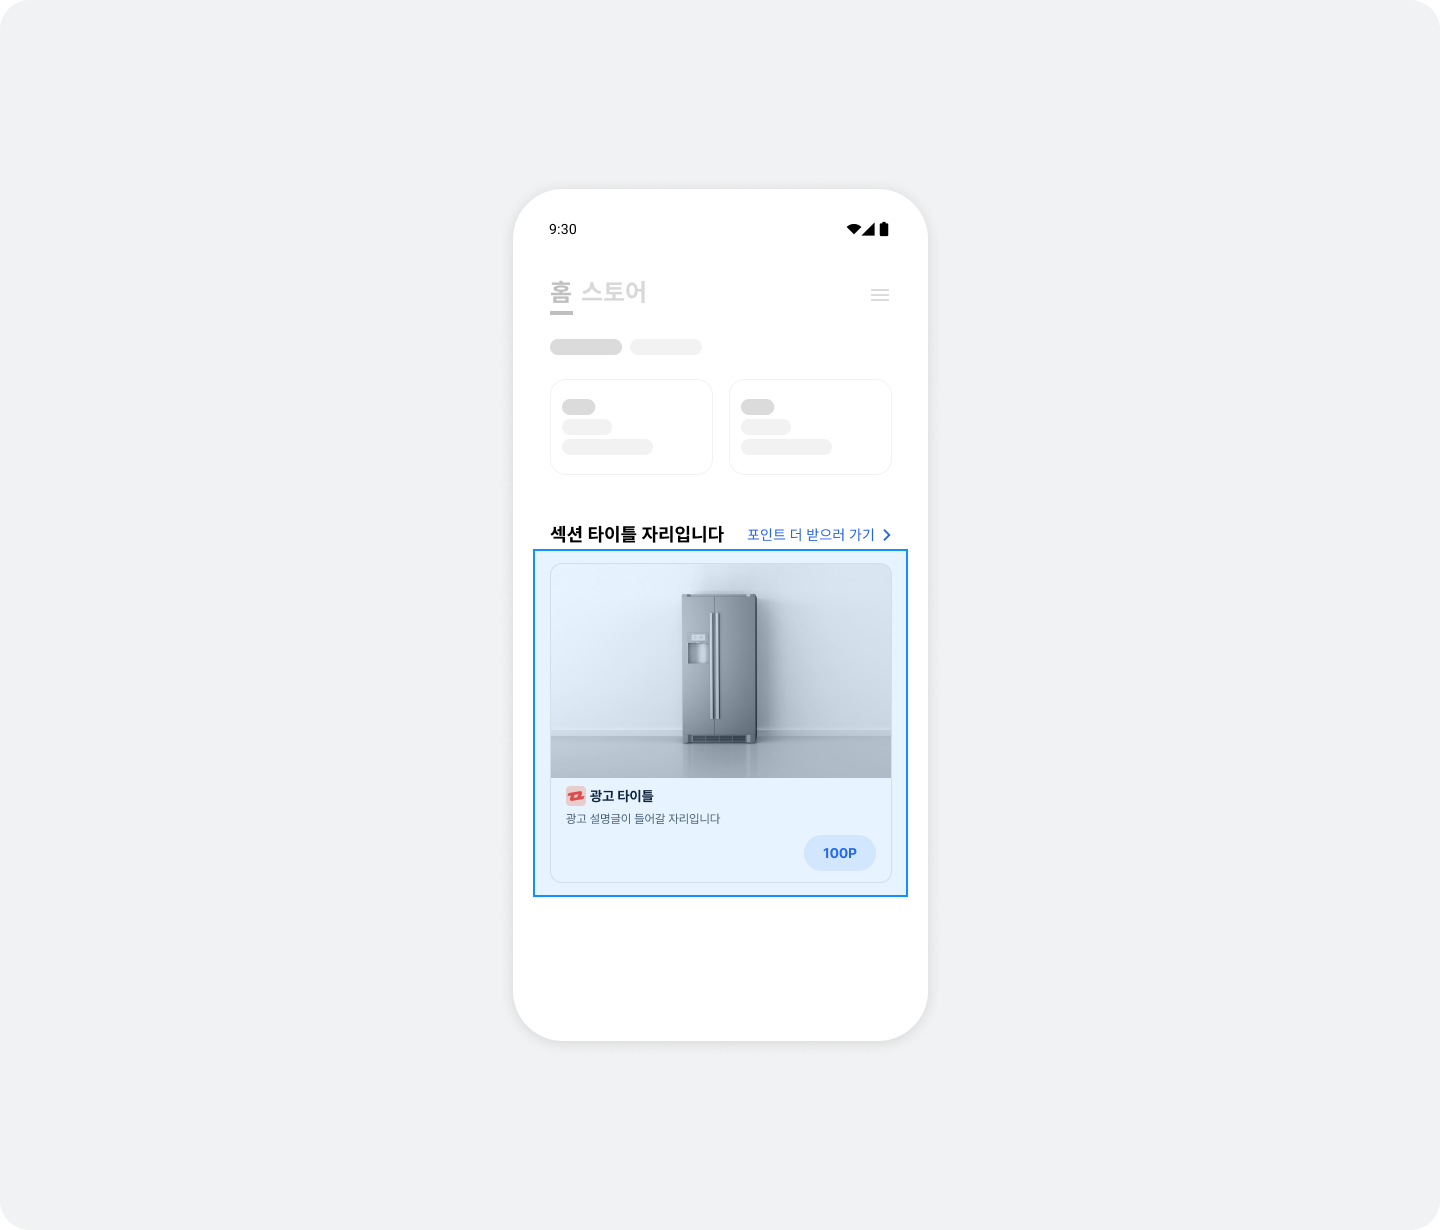
네이티브 광고 레이아웃을 구성하는 요소와 UI에 대해서는 아래의 그림과 표를 참고하세요.

| 구성 요소 | 설명 |
|---|---|
| 광고 제목 (필수) | 광고의 제목입니다. 최대 10자까지 권장하며, 필요에 따라 글자 수에 상관 없이 일정 부분은 생략 부호도 대체할 수 있습니다. |
| 광고 소재 (필수) | 이미지, 동영상 등 광고 소재입니다. 광고 소재의 종횡비는 반드시 유지해야 합니다., BuzzMediaView를 사용해서 표시해야 합니다., 사이즈: 1,200 x 627 (px), 여백을 추가할 수 있습니다. 자세한 내용은 버즈빌 담당 매니저(help@buzzvil.com)에게 문의하세요. |
| 광고 설명 (필수) | 광고에 대한 상세 설명입니다. 최대 40자까지 권장하며, 필요에 따라 글자 수에 상관 없이 일정 부분은 생략 부호로 대체할 수 있습니다. |
| 광고주 아이콘 (필수) | 광고주 아이콘 이미지입니다. 아이콘의 종횡비는 반드시 유지해야 합니다., 사이즈: 80 x 80 (px) |
| CTA 버튼 (필수) | 광고의 참여를 유도하는 버튼입니다. 최대 7자까지 권장하며, 필요에 따라 글자 수에 상관 없이 일정 부분은 생략 부호로 대체할 수 있습니다., BuzzDefaultCtaView 클래스를 사용해서 표시해야 합니다., CTA 버튼의 색상을 변경하려면 주요 색상 토픽을 참고하세요. 이 외의 디자인을 추가적으로 변경하려면 CTA 버튼 자체 구현하기 토픽을 참고해 자체적으로 구현한 디자인으로 교체하세요. |
| 베네핏허브 진입점 (필수) | 유저가 클릭하면 바로 베네핏허브로 이동하는 UI입니다. 원하시는 뷰 형태로 구성하여 BuzzNativeAdView 레이아웃 아래에 추가하세요. |
네이티브 광고 레이아웃은 뷰 컨트롤러 또는 자체 구현 뷰에 아래 구조에 맞게 구성해야 합니다. 네이티브 광고 지면을 구현하려면 다음의 절차를 따르세요.
다음은 네이티브 광고 레이아웃 규격에 따라 뷰 컨트롤러를 구성하는 예시입니다.
import UIKit
import BuzzvilSDK

final class ViewController: UIViewController {
  private let nativeAdView = BuzzNativeAdView(frame: .zero)
  private let mediaView = BuzzMediaView(frame: .zero)
  private let iconImageView = UIImageView(frame: .zero)
  private let titleLabel = UILabel(frame: .zero)
  private let descriptionLabel = UILabel(frame: .zero)
  private let ctaView = BuzzDefaultCtaView(frame: .zero) // DefaultBuzzCtaView 대신 자체 구현 CTA 뷰를 사용할 수 있습니다.

  private lazy var benefitHubEntryView: UILabel = {
    let label = UILabel(frame: .zero)
    label.text = "포인트 더 받으러 가기 >"

    return label
  }()

  private lazy var viewBinder = BuzzNativeViewBinder.Builder()
    .nativeAdView(nativeAdView)
    .mediaView(mediaView)
    .iconImageView(iconImageView)
    .titleLabel(titleLabel)
    .descriptionLabel(descriptionLabel)
    .ctaView(ctaView)
    .build()

  override func viewDidLoad() {
    super.viewDidLoad()

    self.view.addSubview(benefitHubEntryView)
    benefitHubEntryView.addGestureRecognizer(UITapGestureRecognizer(target: self, action: #selector(showBenefitHub)))

    self.view.addSubview(nativeAdView)
    nativeAdView.addSubview(mediaView)
    nativeAdView.addSubview(iconImageView)
    nativeAdView.addSubview(titleLabel)
    nativeAdView.addSubview(descriptionLabel)
    nativeAdView.addSubview(ctaView)

    // AutoLayout Constraints 설정
    // ...
  }

  @objc
  private func showBenefitHub() {
    let benefitHub = BuzzBenefitHub()

    benefitHub.show(on: self)
  }
}
뷰 컨트롤러나 자체 구현 뷰 이외의 다른 방식으로 네이티브 지면을 구현하려면 버즈빌 담당자(help@buzzvil.com)에게 문의하세요.
3 단계. 광고 보여주기
광고 레이아웃에 광고를 보여주기 위해 예시 코드를 참고하여 다음의 절차를 따르세요.
BuzzNative인스턴스를 생성하고load()함수를 호출하여 광고를 할당합니다.onSuccess와onFailure클로저를 구현하여 광고 할당 성공과 실패 시 동작을 정의합니다.
- 생성된
BuzzNative인스턴스를BuzzNativeViewBinder의bind()에 전달하여 광고를 레이아웃에 표시합니다.- 사용자가 광고 참여 완료시 자동으로 다음 광고로 갱신됩니다.
- (Optional) 광고 갱신 상태에 따라 UI 등 원하는 동작을 구현하려면
subscribeRefreshEvents()함수의 인자로onRequest,onSuccess,onFailure클로저를 구현하여 필요한 시점에 원하는 동작을 수행하세요.load()함수를 호출하기 전에subscribeRefreshEvents()를 호출하세요.- 한번 클로저를 설정해두면, 이후 자동 갱신에서도 동일하게 사용됩니다.
✏️ 참고
- 참여 완료 상태가 존재하지 않는 논리워드 콘텐츠, 이미 참여 완료된 광고는 클릭 후 랜딩 페이지에서 네이티브 지면으로 돌아올 때 다음 광고로 갱신됩니다.
- 유저가 광고에 참여 중인 상태(CTA View가 '참여 확인 중'인 경우)에는 다음 광고로 갱신되지 않습니다.
- 자동 광고 갱신을 비활성화하려면 버즈빌 담당자(help@buzzvil.com)에게 문의하세요.
⚠️ 주의
모든 클로저 내에서 네이티브 지면이 구성된 클래스에 접근한다면, retain cycle을 방지하기 위해 반드시weak self를 사용해주세요.
final class ViewController: UIViewController {
  private lazy var native = BuzzNative(unitId: "YOUR_NATIVE_UNIT_ID")

  private lazy var viewBinder = BuzzNativeViewBinder.Builder()
    .nativeAdView(nativeAdView)
    .mediaView(mediaView)
    .iconImageView(iconImageView)
    .titleLabel(titleLabel)
    .descriptionLabel(descriptionLabel)
    .ctaView(ctaView)
    .build()

  override func viewDidLoad() {
    // Warning: retain cycle 방지를 위해 closure 내에서 반드시 weak self를 사용해주세요.
    native.subscribeRefreshEvents(
      onRequest: { [weak self] in
        // 광고 갱신 할당을 요청한 상태입니다.
        // 이후에는 onSuccess, onFailure 중 하나가 호출됩니다.
        // 광고 자동 갱신을 시도할 때마다 반복적으로 호출됩니다.
      },
      onSuccess: { [weak self] nativeAd in
        // 광고 갱신 할당에 성공하면 호출됩니다.
      },
      onFailure: { [weak self] error in
        // 더 이상 갱신할 수 있는 광고가 없을 때 호출됩니다.
      }
    )

    // 광고 할당을 수행합니다.
    native.load(
      onSuccess: { [weak self] nativeAd in
        // 초기 광고 할당에 성공하면 호출됩니다.
      },
      onFailure: { [weak self] error in
        // 초기 광고 할당에 실패하면 호출됩니다.
      }
    )

    // 할당된 광고 표시를 자동으로 수행합니다.
    viewBinder.bind(native)
  }
}
load()함수의 onFailure클로저가 호출되고 광고가 노출되지 않습니다. 광고 미할당 시 발생하는NSError` 오류 코드에 대한 자세한 내용은 오류 코드가 나타납니다 토픽을 참고하세요.
- 광고 갱신 시 할당 받을 수 있는 광고가 없을 때는
subscribeRefreshEvents()함수의onFailure가 호출되고 이전 광고가 유지됩니다.
✏️ 참고
Q. 최초 요청 성공/실패와 이후 요청 성공/실패를 구분하는 이유가 무엇인가요?
A. 최초 요청 실패 시에는 보여줄 수 있는 광고가 없기 때문에 관련 레이아웃을 숨김 처리하고, 이후 요청 실패 시에는 이전에 할당받은 광고를 계속 노출할 수 있기 때문에 최초 실패와 이후 실패를 구분합니다.
광고 운영 정책 (필수 준수 사항)
1. 광고 리프레시 금지
- 광고 요청은 앱 화면이 켜지는 시점에 최초 1회만 진행해주세요.
- 이후 광고 재요청(재할당)은 화면 전환 등 명확한 사용자 액션이 있을 때만 허용됩니다.
- 일정 시간 간격으로 자동으로 광고를 리프레시하거나, 지속적으로 새 광고를 요청하는 방식은 금지됩니다.
과도한 광고 요청은 사용자 경험을 저해하고, 광고 효율 및 수익에 악영향을 미칠 수 있습니다.
2. 노출형 광고만의 선택적 사용 금지
- 버즈빌은 다양한 광고 타입을 조합하여 최적화된 광고 경험을 제공합니다.
- API 연동 시, 특정 광고 타입(예: 노출형 광고)만 선택적으로 사용하는 방식은 허용되지 않습니다.
- SDK 연동의 경우, 노출형 광고가 없을 때 다른 플랫폼의 광고를 호출하는 방식은 금지됩니다.
- 반드시 버즈빌 광고 로직에 따라 전체 광고 타입을 균형 있게 운영해주시기 바랍니다.
광고 타입 제한 및 선별적 사용은 버즈빌의 광고 운영 전략과 수익 최적화에 부정적인 영향을 줍니다.
추가 구현
네이티브에 추가 기능을 구현하는 방법을 안내합니다.
네이티브 오버레이 사용하기
✏️ 참고
네이티브 오버레이의 UI를 설정하려면 네이티브 오버레이 UI 를 참고하세요.
네이티브 오버레이는 별도의 연동이나 구현할 필요 없는 기능으로, 유저가 네이티브 광고에 참여한 후 앱으로 되돌아오면 참여 완료된 광고 위에 베네핏허브로의 진입을 유도하는 오버레이 UI를 제공합니다. 오버레이 UI는 텍스트와 아이콘으로 구성되어 있으며, 네이티브 전체 영역(NativeAdView)을 덮어 유저의 클릭을 유도합니다. 유저가 닫기 버튼을 클릭하거나 오버레이를 클릭한 후 다시 돌아오면 오버레이는 자동으로 사라집니다.
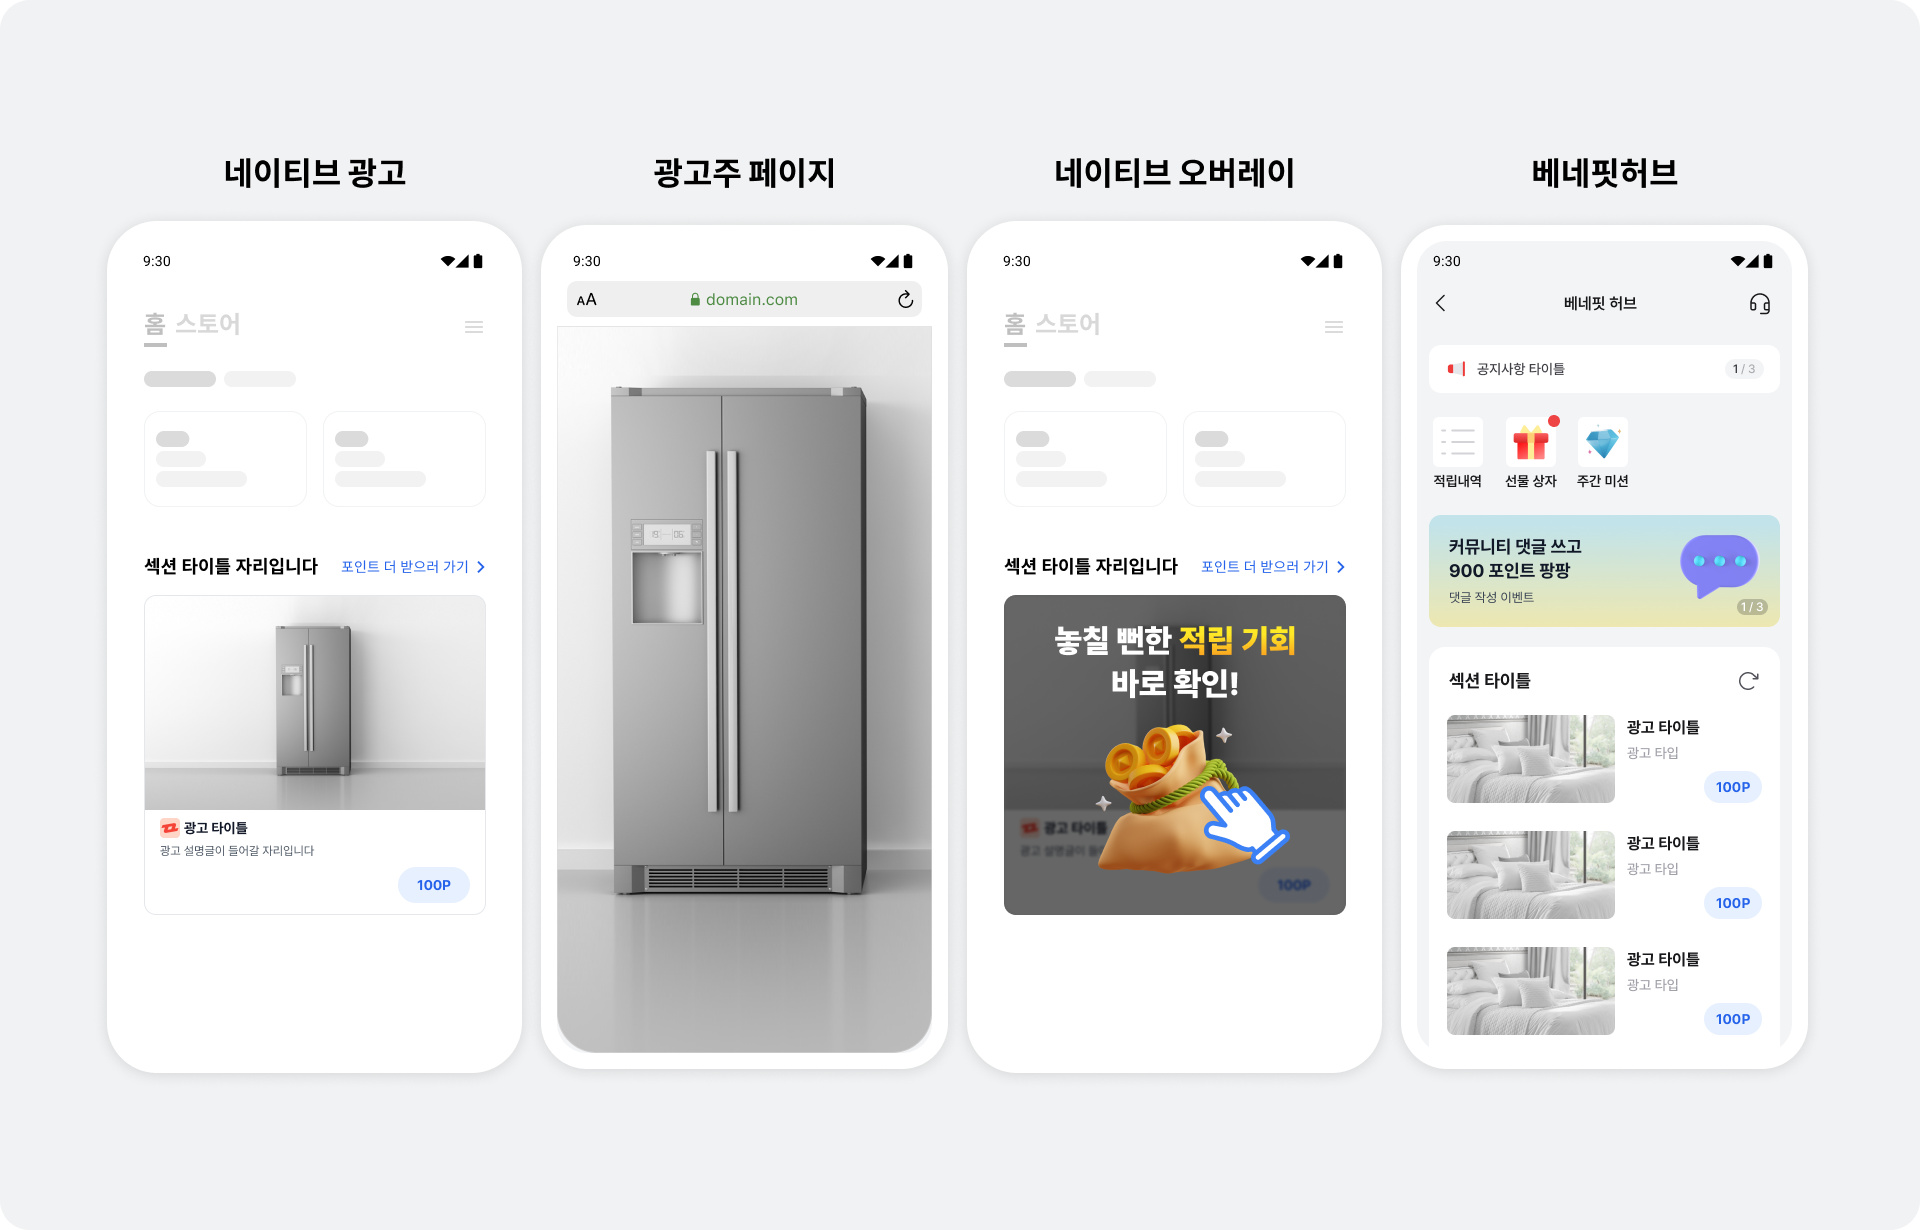
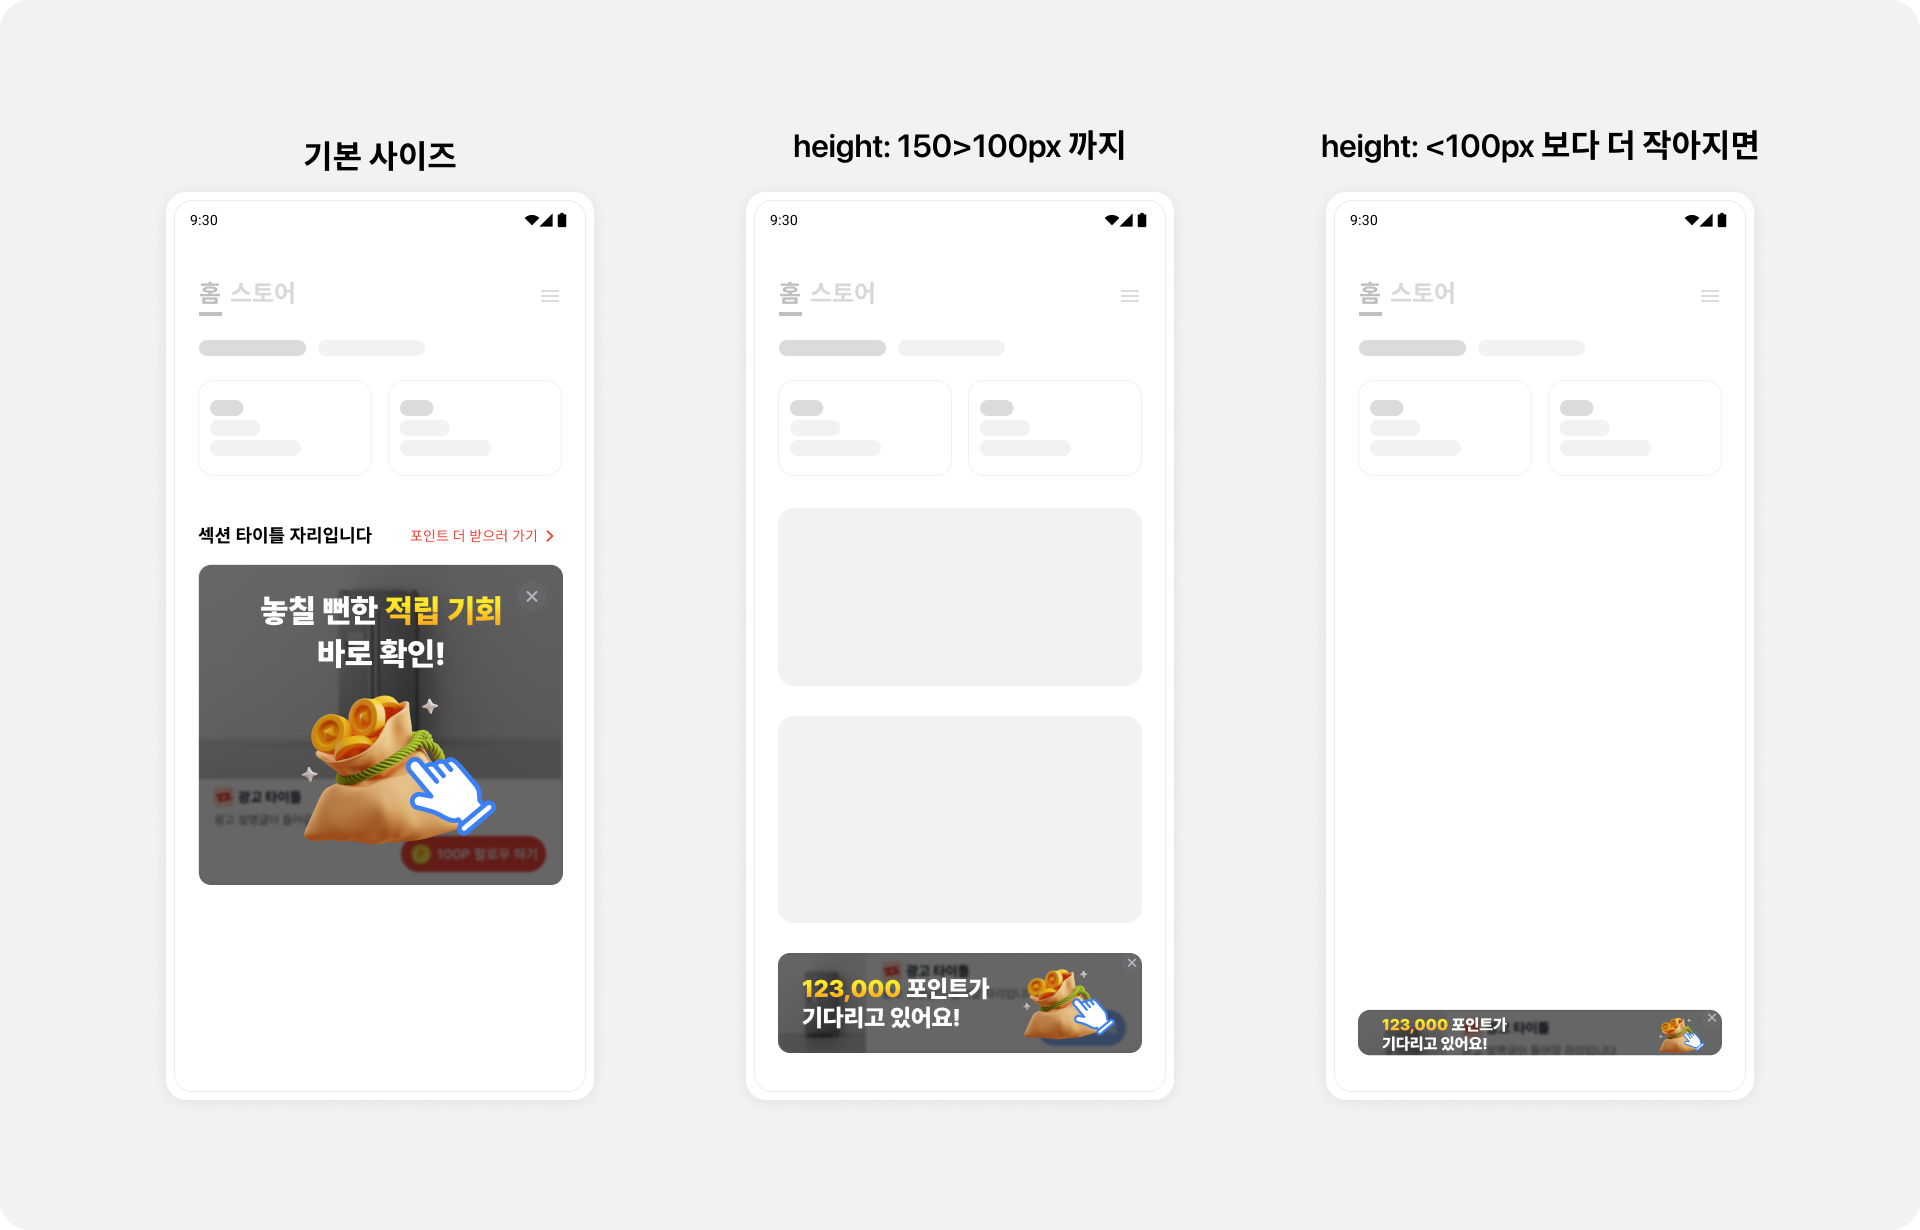
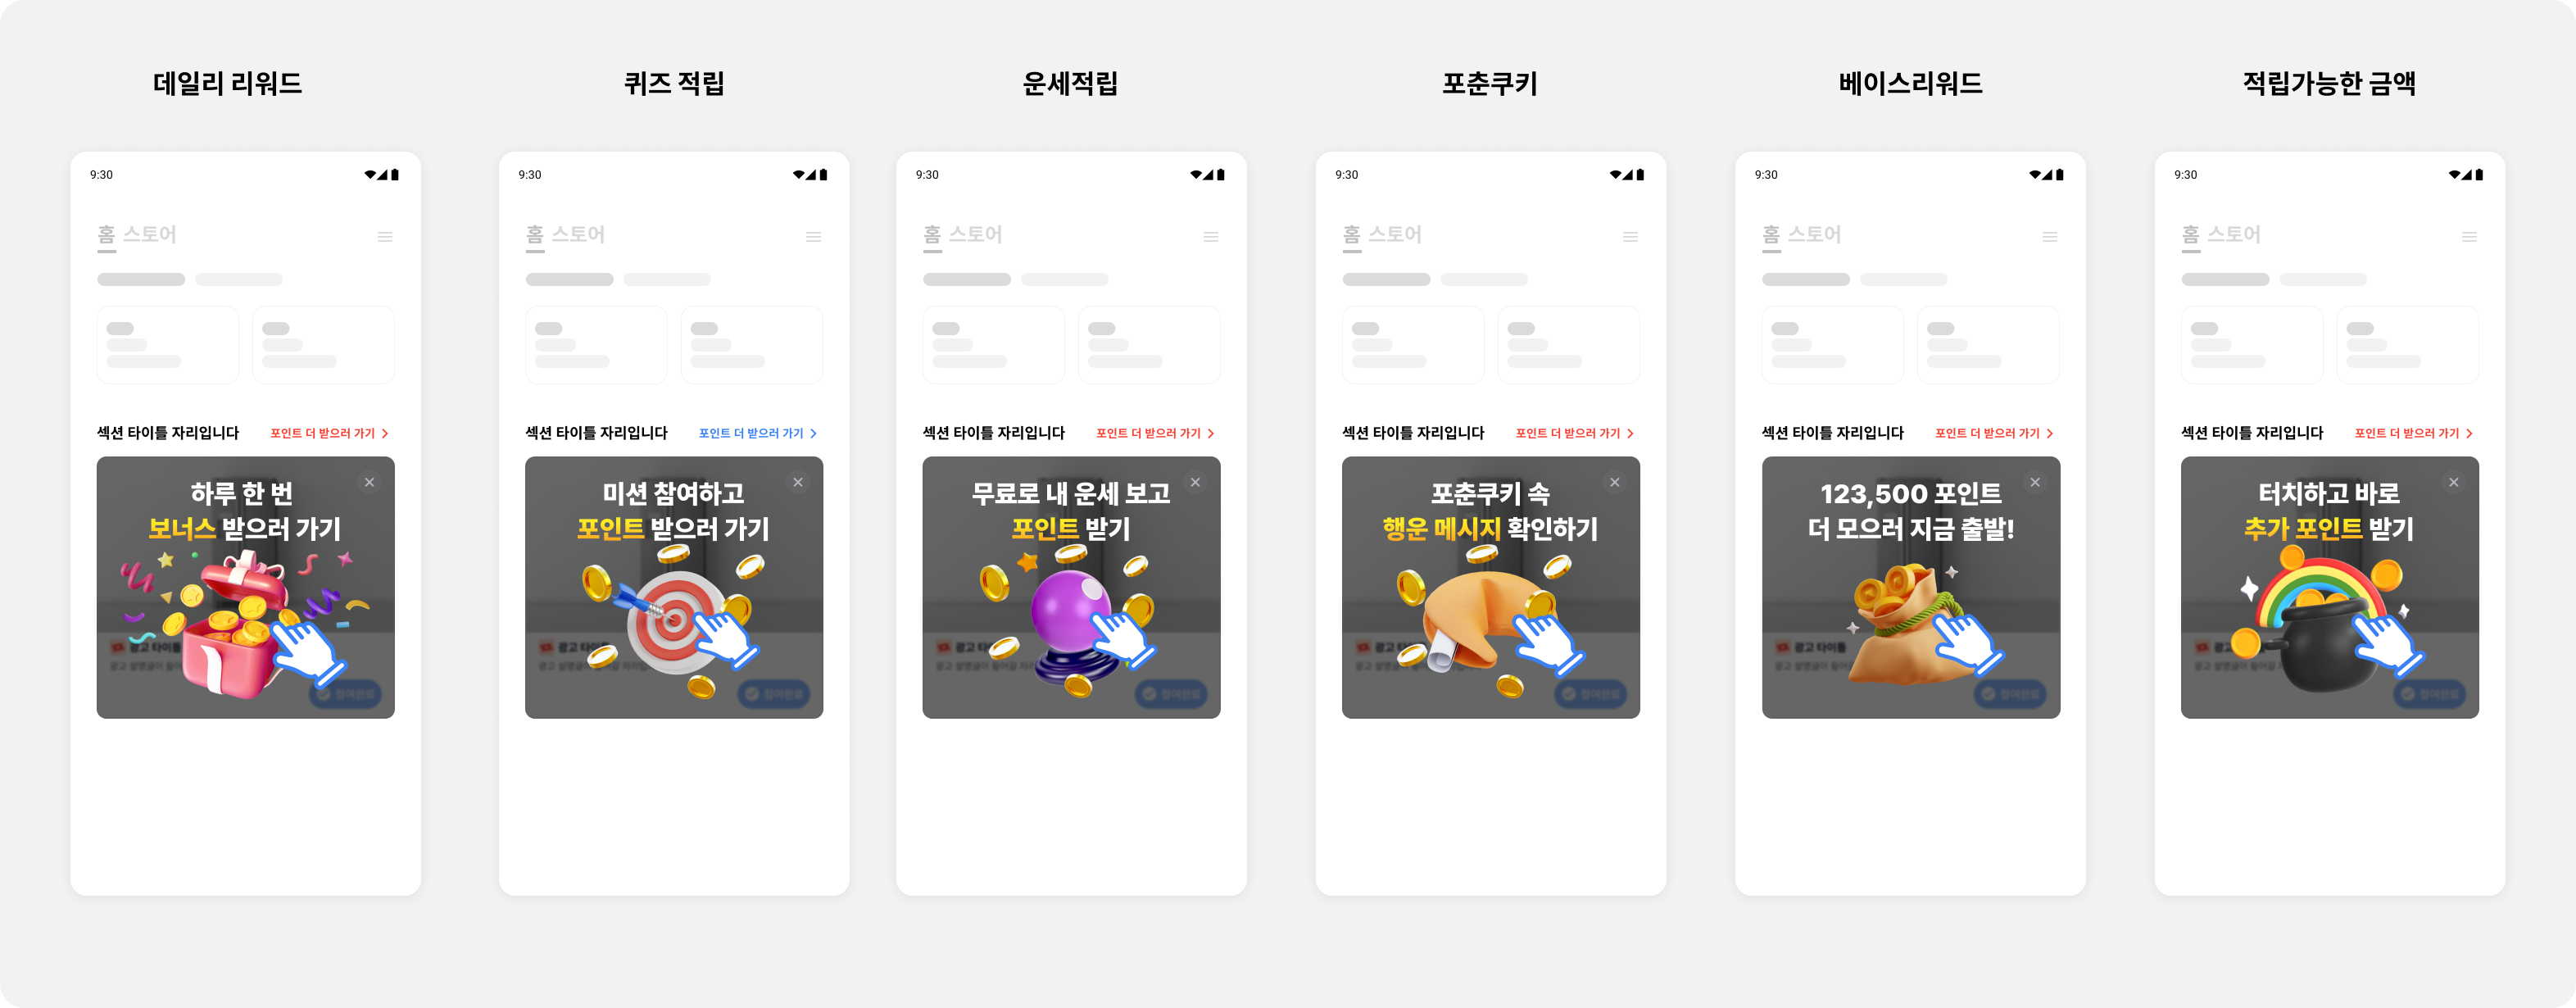
네이티브 지면 구현 크기에 따른 오버레이 UI 를 제공하며 네이티브 오버레이에서는 베네핏허브 진입 비율을 높이기 위해 유저의 과거 참여 이력을 기반으로 선호하는 광고나 콘텐츠 광고 상품의 UI를 다양하게 노출됩니다. 각 UI 종류별 랜딩 페이지는 아래와 같습니다.
- 데일리 리워드: 베네핏허브 데일리 리워드 바텀시트
- 베네핏허브 안에서 데일리 리워드를 활성화하지 않으면 노출되지 않습니다.
- 데일리 리워드에 대해서는 여기를 참고하세요.
- 퀴즈적립: 베네핏허브 콘텐츠적립 필터
- 운세적립: 베네핏허브 콘텐츠적립 필터
- 포춘쿠키: 베네핏허브 콘텐츠적립 필터
- 베이스 리워드: 베네핏허브
- 베네핏허브 안에서 베이스 리워드를 활성화하지 않으면 노출되지 않습니다.
- 적립가능한 리워드 총액: 베네핏허브
- 기본 UI: 베네핏허브
- 서버 통신 에러 발생 시 나타납니다.
광고 이벤트 리스너 등록하기
✏️ 참고
광고 참여 상태에 따라 CTA View를 변경하기 위해 이벤트 리스너를 사용했다면, 더 이상 사용할 필요 없습니다.
리워드 적립 결과(BuzzRewardResult) 종류는 리워드 적립 결과(BuzzRewardResult) 종류를 참고하세요.
BuzzNative.subscribeAdEvents()를 통해 광고 콜백 이벤트를 수신할 수 있습니다. 광고 콜백 이벤트를 수신하려면 load() 함수를 호출하기 전에 subscribeAdEvents() 함수를 호출해야 합니다.
다음은 BuzzNative에서 광고 이벤트를 수신하는 예시입니다.
final class ViewController: UIViewController {
  // ...생략...

  override func viewDidLoad() {
    // ...생략...

    // Native 광고 이벤트 처리를 위한 closure를 등록하고 각 이벤트에 따라 필요한 기능을 구현합니다.
    // Warning: retain cycle 방지를 위해 closure 내에서 반드시 weak self를 사용해주세요.
    native.subscribeAdEvents(onImpressed: { [weak self] nativeAd in
      // Native 광고가 유저에게 노출되었을 때 호출됩니다.
    }, onClicked: { [weak self] nativeAd in
      // 유저가 Native 광고를 클릭했을 때 호출됩니다.
    }, onRewardRequested: { [weak self] nativeAd in
      // 리워드 적립 요청시에 호출됩니다.
    }, onRewarded: { [weak self] nativeAd, rewardResult in
      // 리워드 적립 결과를 수신했을 때 호출됩니다.
    }, onParticipated: { [weak self] nativeAd in
      // 광고 참여가 완료되었을 때 호출됩니다.
    })

    // ...생략...
  }
}
ardResult`) 종류
| BuzzRewardResult | 결과 | 설명 |
|---|---|---|
success | 적립성공 | 적립에 성공했습니다. |
alreadyParticipated | 적립 실패 | 이미 적립된 광고입니다. |
missingReward | 적립 실패 | 리워드가 없는 광고입니다. |
tooShortToParticipate | 적립 실패 | 광고 랜딩 페이지에서 너무 빨리 돌아왔습니다. |
connectionTimeout | 적립 실패 | 네트워크 타임 아웃이 발생했습니다. |
browserNotLaunched | 적립 실패 | 광고 랜딩 페이지를 보기위한 브라우저가 실행되지 않았습니다. |
networkError | 적립 실패 | 알 수 없는 네트워크 오류가 발생했습니다. |
serverError | 적립 실패 | 알 수 없는 서버 오류가 발생했습니다. |
clientError | 적립 실패 | 알 수 없는 클라이언트 오류가 발생했습니다. |
unknown | 적립 실패 | 알 수 없는 오류가 발생했습니다. |
캐러셀 구현하기
캐러셀(Carousel)은 여러 개의 광고를 가로로 스크롤 하여 유저에게 노출할 수 있는 UI입니다. Buzzvil SDK를 사용하여 네이티브 지면에 캐러셀을 생성하고 필수 기능을 구현해 캐러셀을 구현할 수 있습니다. 또한 선택에 따라 구현할 수 있는 부가 기능들을 통해 유저 경험을 최적화할 수 있습니다.
✏️ 참고
전체 코드를 확인하려면 GitHub 샘플 코드를 참고하세요.
캐러셀의 기본 기능 구현하기
1 단계. 광고 할당 받기
네이티브에서 여러 개의 광고를 할당 받기 위해서는 광고 중복 할당을 제어하는 클래스인 BuzzNativeGroup을 사용해야 합니다.
BuzzNativeGroup.load()을 호출하여 현재 할당 받을 수 있는 광고의 개수를 확인합니다.
✏️ 참고
- 최대 10개의 광고를 요청할 수 있습니다.
- 1개 이상의 광고가 할당된 경우
onSuccess가 호출됩니다. 할당에 성공한 광고의 개수는 요청한 광고의 개수보다 적을 수 있습니다.- 최초 광고 할당 요청에 실패했을 때는
onFailure가 호출되고 광고가 노출되지 않습니다. 광고 미할당 시 발생하는NSError오류 코드에 대한 자세한 내용은 오류 코드가 나타납니다 토픽을 참고하세요.
import UIKit
import BuzzvilSDK

final class CarouselViewController: UIViewController {
  private let unitId = "YOUR_UNIT_ID"

  // 최대 10개의 광고를 요청할 수 있습니다.
  private let adRequestCount = 5

  // 실제 할당받은 광고의 개수입니다.
  // 이 값은 collectionView datasource의 collectionView(_:numberOfItemsInSection:) 함수의 return 값으로 사용합니다.
  private var loadedAdCount = 0

  // 광고 중복 할당을 막기 위해 하나의 캐러셀에 하나의 BuzzNativeGroup 인스턴스를 생성하여 사용합니다.
  private lazy var nativeGroup = BuzzNativeGroup(unitId: unitId)

  override func viewDidLoad() {
    super.viewDidLoad()
    setupCarousel()
  }

  private func setupCarousel() {
    // BuzzNativeGroup에 광고 할당을 요청합니다.
    nativeGroup.load(
      count: adRequestCount,
      onSuccess: { [weak self] adCount in
        // 실제로 할당받은 광고의 개수(count)를 업데이트합니다.
        self?.loadedAdCount = adCount
      },
      onFailure: { [weak self] error in
        // 광고 할당 실패 시 발생하는 NSError 오류 코드에 대한 자세한 내용은 오류 코드가 나타납니다 토픽을 참고하세요.
      }
    )
  }
}
ViewCell 구현하기
아이템 뷰를 화면에 가로 레이아웃으로 표시하는 UICollectionView를 사용하여 네이티브 지면에 캐러셀을 구현할 수 있습니다.
UICollectionView에서 사용할 UICollectionViewCell을 생성하려면 다음의 절차를 따르세요.
UICollectionViewCell을 상속받는CarouselCell을 선언하세요. 광고 레이아웃 구성하기를 참고하여 광고 UI를 구성해주세요.
import UIKit
import BuzzvilSDK

final class CarouselCell: UICollectionViewCell {
  private lazy var nativeAdView = BuzzNativeAdView(frame: .zero)
  private lazy var mediaView = BuzzMediaView(frame: .zero)
  private lazy var iconImageView = UIImageView(frame: .zero)
  private lazy var titleLabel = UILabel(frame: .zero)
  private lazy var descriptionLabel = UILabel(frame: .zero)
  private lazy var ctaView = BuzzDefaultCtaView(frame: .zero)

  override init(frame: CGRect) {
    super.init(frame: frame)
    setupView()
    setupLayout()
  }

  required init?(coder: NSCoder) {
    fatalError()
  }

  private func setupView() {
    contentView.addSubview(nativeAdView)
    nativeAdView.addSubview(mediaView)
    nativeAdView.addSubview(iconImageView)
    nativeAdView.addSubview(titleLabel)
    nativeAdView.addSubview(descriptionLabel)
    nativeAdView.addSubview(ctaView)
  }

  private func setupLayout() {
    // eg. auto layout constraints for nativeAd2View
    nativeAdView.translatesAutoresizingMaskIntoConstraints = false
    NSLayoutConstraint.activate([
      nativeAdView.topAnchor.constraint(equalTo: safeAreaLayoutGuide.topAnchor),
      nativeAdView.leadingAnchor.constraint(equalTo: safeAreaLayoutGuide.leadingAnchor, constant: 16),
      nativeAdView.trailingAnchor.constraint(equalTo: safeAreaLayoutGuide.trailingAnchor, constant: -16),
      nativeAdView.bottomAnchor.constraint(equalTo: safeAreaLayoutGuide.bottomAnchor),
    ])

    // AutoLayout Constraints를 설정하세요.
    // ...
  }
}
zNativeViewBinder를 선언하세요. BuzzNativeAdView, BuzzMediaView, 그리고 광고를 보여주기 위해 필요한 뷰를 모두 설정하여 BuzzNativeViewBinder` 객체를 생성하세요.
final class CarouselCell: UICollectionViewCell {
  private lazy var nativeAdView = BuzzNativeAdView(frame: .zero)
  private lazy var mediaView = BuzzMediaView(frame: .zero)
  private lazy var iconImageView = UIImageView(frame: .zero)
  private lazy var titleLabel = UILabel(frame: .zero)
  private lazy var descriptionLabel = UILabel(frame: .zero)
  private lazy var ctaView = BuzzDefaultCtaView(frame: .zero)

  // NativeAdView와 하위 컴포넌트를 연결합니다.
  private lazy var viewBinder = BuzzNativeViewBinder.Builder()
    .nativeAdView(nativeAdView)
    .mediaView(mediaView)
    .iconImageView(iconImageView)
    .titleLabel(titleLabel)
    .descriptionLabel(descriptionLabel)
    .ctaView(ctaView)
    .build()

  // ...
}
ndex에 해당하는 cell 데이터를 구성할 때 사용할 bind() 메서드를 CarouselCell에 구현하세요.
Cell을 재사용할 때 이전의 광고 데이터가 남아있지 않도록 prepareForReuse() 메서드에서 unbind() 메서드를 호출해주세요.
final class CarouselCell: UICollectionViewCell {
  // ...

  private lazy var viewBinder = BuzzNativeViewBinder.Builder()
    .nativeAdView(nativeAdView)
    .mediaView(mediaView)
    .iconImageView(iconImageView)
    .titleLabel(titleLabel)
    .descriptionLabel(descriptionLabel)
    .ctaView(ctaView)
    .build()

  // ...

  override func prepareForReuse() {
    super.prepareForReuse()
    // prepareForReuse 내에서 unbind를 반드시 호출하여 cell을 재사용할 때 문제가 발생하지 않게 합니다.
    viewBinder.unbind()
  }

  // collectionView의 collectionView(_:cellForItemAt:) 시점에 호출합니다.
  func bind(with native: BuzzNative) {
   // bind()를 호출하면 할당된 광고 표시 및 갱신이 자동으로 수행됩니다.
    viewBinder.bind(native)
  }
}
View 구현하기
네이티브 지면의 캐러셀을 위한 UICollectionView를 생성하려면 다음의 절차를 따르세요.
- 캐러셀을 넣고 싶은 영역에
UICollectionView를 선언하세요.UICollectionView의 속성, 뷰 계층, 오토레이아웃을 아래 코드와 같이 구성하세요.
final class CarouselViewController: UIViewController {
  // ...

  // 광고를 표시할 Carousel CollectionView
  private lazy var carouselCollectionView: UICollectionView = {
    let collectionView = UICollectionView(frame: .zero)
    collectionView.register(CarouselCell.self, forCellWithReuseIdentifier: "CarouselCell")
    collectionView.delegate = self
    collectionView.dataSource = self
    collectionView.showsHorizontalScrollIndicator = false
    collectionView.isPagingEnabled = true
    return collectionView
  }()

  override func viewDidLoad() {
    super.viewDidLoad()
    setupView()
    setupLayout()
    setupCarousel()
  }

  // ...

  private func setupView() {
    view.addSubview(carouselCollectionView)
  }

  private func setupLayout() {
    // eg. auto layout constraints for carouselCollectionView
    carouselCollectionView.translatesAutoresizingMaskIntoConstraints = false
    NSLayoutConstraint.activate([
      carouselCollectionView.topAnchor.constraint(equalTo: view.safeAreaLayoutGuide.topAnchor, constant: 16),
      carouselCollectionView.leadingAnchor.constraint(equalTo: view.safeAreaLayoutGuide.leadingAnchor),
      carouselCollectionView.trailingAnchor.constraint(equalTo: view.safeAreaLayoutGuide.trailingAnchor),
      carouselCollectionView.heightAnchor.constraint(equalTo: carouselCollectionView.widthAnchor, multiplier: 0.8),
    ])
  }

  // ...
}
aSource의 필수 메서드들을 아래와 같이 구현하세요. collectionView(:numberOfItemsInSection:)메서드의 반환값은 실제 할당된 광고의 개수인loadedAdCount로 설정하세요. collectionView(:cellForItemAt:)메서드에서는CarouselCell을 dequeue 하고 bind()` 메서드를 순서대로 호출하세요.
final class CarouselViewController: UIViewController {
  // ...

  private var loadedAdCount = 0

  private lazy var carouselCollectionView: UICollectionView = {
    let collectionView = UICollectionView(frame: .zero)
    // ...
    return collectionView
  }()

  // ...
}

extension CarouselViewController: UICollectionViewDataSource {
  func collectionView(_ collectionView: UICollectionView, numberOfItemsInSection section: Int) -> Int {
    return loadedAdCount
  }

  func collectionView(_ collectionView: UICollectionView, cellForItemAt indexPath: IndexPath) -> UICollectionViewCell {
    guard let cell = collectionView.dequeueReusableCell(withReuseIdentifier: "CarouselCell", for: indexPath) as? CarouselCell else {
      return UICollectionViewCell()
    }

    let native = nativeGroup.natives[indexPath.item]
    cell.bind(with: native)
    return cell
  }
}
owLayout을 선언하세요. UICollectionViewFlowLayout의 속성을 아래 코드와 같이 구성하고, carouselCollectionView에 설정하세요. UICollectionViewDelegateFlowLayout의 collectionView(_:layout:sizeForItemAt:)` 메서드를 아래와 같이 구현하세요.
final class CarouselViewController: UIViewController {
  // ...

  private lazy var flowLayout: UICollectionViewFlowLayout = {
    let flowLayout = UICollectionViewFlowLayout()
    flowLayout.scrollDirection = .horizontal
    flowLayout.minimumLineSpacing = .zero
    flowLayout.minimumInteritemSpacing = .zero
    return flowLayout
  }()

  private lazy var carouselCollectionView: UICollectionView = {
    // flowLayout을 carouselCollectionView에 설정하세요.
    let collectionView = UICollectionView(frame: .zero, collectionViewLayout: flowLayout)
    // ...
    return collectionView
  }()

  // ...
}

// ...

extension CarouselViewController: UICollectionViewDelegateFlowLayout {
  func collectionView(_ collectionView: UICollectionView, layout collectionViewLayout: UICollectionViewLayout, sizeForItemAt indexPath: IndexPath) -> CGSize {
    return CGSize(width: collectionView.frame.size.width, height: collectionView.frame.size.height)
  }
}
d()의 완료 시점에, reloadData()를 호출하여 carouselCollectionView`를 갱신하세요.
final class CarouselViewController: UIViewController {
  // ...

  private lazy var carouselCollectionView: UICollectionView = {
    let collectionView = UICollectionView(frame: .zero, collectionViewLayout: flowLayout)
    // ...
    return collectionView
  }()

  private lazy var nativeGroup = BuzzNativeGroup(unitId: unitId)

  override func viewDidLoad() {
    super.viewDidLoad()
    // ...
    setupCarousel()
  }

  // ...

  private func setupCarousel() {
    nativeGroup.load(count: adRequestCount) { [weak self] adCount in
      // ...

      // 광고 할당이 완료되면 carouselCollectionView를 갱신합니다.
      self?.carouselCollectionView.reloadData()
    } errorHandler: { [weak self] error in
      // ...
    }
  }
}
l 구현하기
캐러셀 아이템의 위치를 나타내는 UIPageControl을 생성하려면 다음의 절차를 따르세요.
UIPageControl을 선언하세요.UIPageControl의 속성, 뷰 계층, 오토레이아웃을 아래 코드와 같이 구성하세요.
final class CarouselViewController: UIViewController {
  // ...

  private lazy var pageControl: UIPageControl = {
    let pageControl = UIPageControl(frame: .zero)
    pageControl.currentPage = .zero
    pageControl.isUserInteractionEnabled = false
    return pageControl
  }()

  // ...

  override func viewDidLoad() {
    super.viewDidLoad()
    setupView()
    setupLayout()
    // ...
  }

  private func setupView() {
    // ...
    view.addSubview(pageControl)
  }

  private func setupLayout() {
    // ...

    // eg. auto layout constraints for pageControl
    pageControl.translatesAutoresizingMaskIntoConstraints = false
    NSLayoutConstraint.activate([
      pageControl.topAnchor.constraint(equalTo: carouselCollectionView.bottomAnchor, constant: 16),
      pageControl.centerXAnchor.constraint(equalTo: carouselCollectionView.centerXAnchor),
    ])
  }
}
d()를 통해 광고를 할당받은 이후, UIPageControl.numberOfPages`를 설정하세요.
final class CarouselViewController: UIViewController {
  // ...

  private lazy var pageControl: UIPageControl = {
    let pageControl = UIPageControl(frame: .zero)
    // ...
    return pageControl
  }()

  // ...

  override func viewDidLoad() {
    super.viewDidLoad()
    // ...
    setupCarousel()
  }

  // ...

  private func setupCarousel() {
    nativeGroup.load(count: adRequestCount) { [weak self] adCount in
      // ...
      self?.pageControl.numberOfPages = adCount
    } errorHandler: { [weak self] error in
      // ...
    }
  }
}
rrentPage를 캐러셀 아이템의 인덱스와 동기화하세요. UIScrollViewDelegate의 scrollViewDidScroll(_:)` 메서드를 아래와 같이 구현하세요.
final class CarouselViewController: UIViewController {
  // ...

  private lazy var pageControl: UIPageControl = {
    let pageControl = UIPageControl(frame: .zero)
    // ...
    return pageControl
  }()

  // ...
}

// ...

extension CarouselViewController: UICollectionViewDelegate {
  func scrollViewDidScroll(_ scrollView: UIScrollView) {
    let centerOffsetX = scrollView.contentOffset.x + (scrollView.frame.width / 2)
    let pageWidth = scrollView.frame.width

    // pageWidth가 0이 되는 경우 division by zero를 방지합니다.
    guard pageWidth != .zero else { return }
    // 현재 캐러셀 아이템의 인덱스를 pageControl의 currentPage에 지정합니다.
    pageControl.currentPage = Int(centerOffsetX / pageWidth)
  }
}
을 확인할 수 있습니다. 이어서 아래 캐러셀의 필수 기능 구현하기를 참고하여 캐러셀 연동을 완료하세요.
캐러셀의 필수 기능 구현하기
Buzzvil SDK는 다양한 광고 및 유저가 취향에 맞게 광고를 필터링할 수 있는 베네핏허브 지면 진입 경로인 슬라이드 페이지와 진입점을 제공합니다.
✅ 중요
기존에 베네핏허브 지면을 연동하고 있거나 연동할 예정이 있는 경우, SDK 연동의 효용성을 극대화하기 위해 베네핏허브 진입점을 반드시 구현하시기 바랍니다.
베네핏허브 진입점
캐러셀에서 베네핏허브로 진입할 수 있는 UI인 진입점을 캐러셀의 상단 또는 하단에 구현해야 합니다.
private lazy var benefitHubEntryView: UILabel = {
  let label = UILabel(frame: .zero)
  label.text = "포인트 더 받으러 가기 >"

  label.addGestureRecognizer(UITapGestureRecognizer(target: self, action: #selector(showBenefitHub)))

  return label
}()

@objc
private func showBenefitHub() {
  let benefitHub = BuzzBenefitHub()

  benefitHub.show(on: self)
}
항목에서는 캐러셀에 부가 기능을 구현하기 위한 다양한 방법 중 일부를 제시합니다. 필요에 따라 적절하게 코드를 변형하여 사용해주세요.
무한 루프 구현하기
캐러셀에서 유한한 아이템을 끊임 없이 스크롤할 수 있는 무한 루프 기능을 구현할 수 있습니다. 캐러셀의 무한 루프를 구현하는 방법는 매우 다양하나, 이 가이드에서는 collectionView(_:numberOfItemsInSection:)에 큰 값을 반환하게 하는 간단한 방법을 제시합니다.
무한 루프를 구현하려면 다음의 절차를 따르세요.
- 캐러셀이 무한한 데이터를 가진 것처럼 표시되도록
UICollectionViewDataSource의collectionView(_:numberOfItemsInSection:)메서드를 수정하세요.UIPageControl.numberOfPages도 동기화해야 합니다.
final class CarouselViewController: UIViewController {
  // ...

  private var loadedAdCount = 0

  private var infiniteItemCount: Int {
    return loadedAdCount * 1000
  }

  // ...

  private lazy var pageControl: UIPageControl = {
    let pageControl = UIPageControl(frame: .zero)
    // ...
    return pageControl
  }()

  override func viewDidLoad() {
    super.viewDidLoad()
    // ...
    setupCarousel()
  }

  // ...

  private func setupCarousel() {
    nativeGroup.load(count: adRequestCount) { [weak self] adCount in
      // ...

      // 고유한 cell 개수를 저장합니다.
      self?.loadedAdCount = adCount
      // 총 cell 개수를 pageControl 개수로 설정합니다.
      self?.pageControl.numberOfPages = self?.infiniteItemCount ?? adCount * 1000
    } errorHandler: { [weak self] error in
      // ...
    }
  }
}

extension CarouselViewController: UICollectionViewDataSource {
  func collectionView(_ collectionView: UICollectionView, numberOfItemsInSection section: Int) -> Int {
    return infiniteItemCount
  }

  // ...
}
aSource의 collectionView(_:cellForItemAt:)` 메서드를 아래와 같이 수정하세요.
고유한 cell의 개수로 모듈러 연산하여 index를 적용합니다.
extension CarouselViewController: UICollectionViewDataSource {
  func collectionView(_ collectionView: UICollectionView, cellForItemAt indexPath: IndexPath) -> UICollectionViewCell {
    guard let cell = collectionView.dequeueReusableCell(withReuseIdentifier: "CarouselCell", for: indexPath) as? CarouselCell else {
      return UICollectionViewCell()
    }

    // 할당된 고유 광고 개수로 모듈러 연산하여 index를 적용합니다.
    let native = nativeGroup.natives[indexPath.item % loadedAdCount]
    cell.bind(with: native)
    return cell
  }
}
d()를 통해 광고를 할당받은 이후, UICollectionView` index를 가운데로 이동하세요.
final class CarouselViewController: UIViewController {
  // ...

  private var loadedAdCount = 0

  private var infiniteItemCount: Int {
    return loadedAdCount * 1000
  }

  // ...

  private lazy var carouselCollectionView: UICollectionView = {
    let collectionView = UICollectionView(frame: .zero, collectionViewLayout: flowLayout)
    // ...
    return collectionView
  }()

  private lazy var pageControl: UIPageControl = {
    let pageControl = UIPageControl(frame: .zero)
    // ...
    return pageControl
  }()

  override func viewDidLoad() {
    super.viewDidLoad()
    // ...
    setupCarousel()
  }

  // ...

  private func setupCarousel() {
    nativeGroup.load(count: adRequestCount) { [weak self] count in
      // ...
      self?.loadedAdCount = count
      self?.pageControl.numberOfPages = infiniteItemCount
      self?.carouselCollectionView.reloadData()
      self?.moveCarouselToMiddle()
    } errorHandler: { [weak self] error in
      // ...
    }
  }

  private func moveCarouselToMiddle() {
    let middleIndex = ((loadedAdCount * 1000) / 2) % loadedAdCount
    let indexPath = IndexPath(item: middleIndex, section: .zero)
    carouselCollectionView.scrollToItem(at: indexPath, at: [.centeredVertically, .centeredHorizontally], animated: false)
    pageControl.currentPage = indexPath.item
  }
}
ative.subscribeRefreshEvents()`를 통해 광고 참여 후 갱신 시 로딩 화면을 구현하여 네트워크 요청에 따른 딜레이를 시각적으로 안내합니다.
final class CarouselCell: UICollectionViewCell {
  // ...

  private lazy var activityIndicatorView: UIActivityIndicatorView = {
    let indicator = UIActivityIndicatorView(frame: .zero)
    indicator.hidesWhenStopped = true
    return indicator
  }()

  override init(frame: CGRect) {
    super.init(frame: frame)
    setupView()
    setupLayout()
  }

  private func setupView() {
    // ...
    contentView.addSubview(activityIndicatorView)
  }

  private func setupLayout() {
    // ...

    activityIndicatorView.translatesAutoresizingMaskIntoConstraints = false
    NSLayoutConstraint.activate([
      activityIndicatorView.centerXAnchor.constraint(equalTo: centerXAnchor),
      activityIndicatorView.centerYAnchor.constraint(equalTo: centerYAnchor),
    ])
  }

  func bind(with native: BuzzNative) {
    native.subscribeRefreshEvents(
      onRequest: { [weak self] in
        self?.activityIndicatorView.startAnimating()
        self?.nativeAdView.alpha = 0.5
      },
      onSuccess: { [weak self] _ in
        self?.activityIndicatorView.stopAnimating()
        self?.nativeAdView.alpha = 1
      },
      onFailure: { [weak self] error in
        self?.activityIndicatorView.stopAnimating()
        self?.nativeAdView.alpha = 1
      },
    )

    viewBinder.bind(native: native)
  }
}

extension CarouselViewController: UICollectionViewDataSource {
  func collectionView(_ collectionView: UICollectionView, cellForItemAt indexPath: IndexPath) -> UICollectionViewCell {
    // ...
    cell.bind(with: native)
    return cell
  }
}
러셀에 포함된 광고가 유저에게 노출되거나 유저가 클릭하는 등의 광고 이벤트가 발생하는 시점을 기록하여 유저 행동을 파악할 수 있습니다.
✏️ 참고
리워드 적립 결과(BuzzRewardResult) 종류는 리워드 적립 결과(BuzzRewardResult) 종류를 참고하세요.
❗️ 주의
- 광고 이벤트 리스너로 베네핏허브 진입 슬라이드의 노출 또는 클릭 이벤트를 수신할 수는 없습니다.
- 로그 기록, 단순 알림 외에 다른 동작을 추가하는 것을 권장하지 않습니다. 직접 구현한 동작이 네이티브에서 제공하는 기능(광고 자동 갱신 등)과 충돌할 수 있습니다.
final class CarouselCell: UICollectionViewCell {
  // ...

  func bind(with native: BuzzNative) {
    // ...

    native.subscribeAdEvents(
      onImpressed: { [weak self] in
        print("impressed: \($0.title)")
      },
      onClicked: { [weak self] in
        print("clicked: \($0.title)")
      },
      onRewardRequested: { [weak self] in
        print("requested reward: \($0.title)")
      },
      onRewarded: { [weak self] in
        print("received reward result: \($0.title), \($1)")
      },
      onParticipated: { [weak self] in
        print("participated: \($0.title)")
      }
    )

    // ...
  }
}

extension CarouselViewController: UICollectionViewDataSource {
  func collectionView(_ collectionView: UICollectionView, cellForItemAt indexPath: IndexPath) -> UICollectionViewCell {
    // ...
    cell.bind(with: native)
    return cell
  }
}
출하기
캐러셀의 앞뒤 아이템이 노출되는 방식으로 구성하려면 다음의 절차를 따르세요.
CarouselCell의 오토레이아웃을 아래와 같이 변경하세요.
final class CarouselCell: UICollectionViewCell {
  private lazy var nativeAdView = BuzzNativeAdView(frame: .zero)

  // ...

  override init(frame: CGRect) {
    super.init(frame: frame)
    // ...
    setupLayout()
    // ...
  }

  private func setupLayout() {
    // CarouselCell과 동일한 크기로 설정합니다.
    nativeAdView.translatesAutoresizingMaskIntoConstraints = false
    NSLayoutConstraint.activate([
      nativeAdView.topAnchor.constraint(equalTo: safeAreaLayoutGuide.topAnchor),
      nativeAdView.leadingAnchor.constraint(equalTo: safeAreaLayoutGuide.leadingAnchor),
      nativeAdView.trailingAnchor.constraint(equalTo: safeAreaLayoutGuide.trailingAnchor),
      nativeAdView.bottomAnchor.constraint(equalTo: safeAreaLayoutGuide.bottomAnchor),
    ])

    // ...
  }

  // ...
}
ler의 flowLayout과 carouselCollectionView를 아래 코드와 같이 설정하세요. UICollectionView의 isPagingEnabled는 캐러셀의 앞뒤 아이템이 노출되는 방식으로 구성할 때 false`로 설정해야 합니다.
final class CarouselViewController: UIViewController {
  private let spacing: CGFloat = 8

  // ...

  private lazy var flowLayout: UICollectionViewFlowLayout = {
    let flowLayout = UICollectionViewFlowLayout()
    // ...

    // flowLayout의 minimumLineSpacing을 spacing 값으로 설정합니다.
    flowLayout.minimumLineSpacing = spacing
    return flowLayout
  }()

  private lazy var carouselCollectionView: UICollectionView = {
    let collectionView = UICollectionView(frame: .zero, collectionViewLayout: flowLayout)
    // ...

    // isPagingEnabled를 false로 설정합니다.
    collectionView.isPagingEnabled = false
    // 아래 속성들을 설정합니다.
    collectionView.decelerationRate = .fast
    collectionView.contentInset = UIEdgeInsets(top: .zero, left: 2 * spacing, bottom: .zero, right: 2 * spacing)
    return collectionView
  }()

  // ...
}
isPagingEnabled 값을 사용하지 않아서, paging 코드를 직접 구현해야 합니다.
아래 코드와 같이 UICollectionViewDelegate의 scrollViewWillEndDragging(_:withVelocity:targetContentOffset:) 메서드를 구현하고, pageControl index 업데이트 코드도 여기로 이동하세요.
final class CarouselViewController: UIViewController {
  private let spacing = 8

  // ...

  private lazy var pageControl: UIPageControl = {
    let pageControl = UIPageControl(frame: .zero)
    // ...
    return pageControl
  }()

  // ...
}

// 위에서 구현했던 scrollViewDidScroll(_:)를 제거합니다.
//
//extension CarouselViewController: UICollectionViewDelegate {
//  func scrollViewDidScroll(_ scrollView: UIScrollView) {
//    let centerOffsetX = scrollView.contentOffset.x + (scrollView.frame.width / 2)
//    let pageWidth = scrollView.frame.width
//    guard pageWidth != .zero else { return }
//    pageControl.currentPage = Int(centerOffsetX / pageWidth)
//  }
//}

// 캐러셀 아이템이 화면에서 일정 부분 넘어가면 다음 아이템으로 이동하도록 구현합니다.
extension CarouselViewController: UICollectionViewDelegate {
  func scrollViewWillEndDragging(_ scrollView: UIScrollView, withVelocity velocity: CGPoint, targetContentOffset: CGPoint) {
    let cellWidth = scrollView.frame.width - (4 * spacing)
    let cellWidthWithSpace = cellWidth + spacing
    let estimatedIndex = scrollView.contentOffset.x / cellWidthWithSpace
    let index: Int

    if velocity.x > 0 {
      index = Int(ceil(estimatedIndex))
    } else if velocity.x < 0 {
      index = Int(floor(estimatedIndex))
    } else {
      index = Int(round(estimatedIndex))
    }
    pageControl.currentPage = index

    targetContentOffset.pointee = CGPoint(x: CGFloat(index) * cellWidthWithSpace - (2 * spacing), y: .zero)
  }
}
egateFlowLayout의 collectionView(_:layout:sizeForItemAt:)` 메서드를 아래와 같이 변경하세요.
final class CarouselViewController: UIViewController {
  private let spacing = 8

  // ...
}

// ...

extension CarouselViewController: UICollectionViewDelegateFlowLayout {
  func collectionView(_ collectionView: UICollectionView, layout collectionViewLayout: UICollectionViewLayout, sizeForItemAt indexPath: IndexPath) -> CGSize {
    return CGSize(width: collectionView.frame.size.width - (4 * spacing), height: collectionView.frame.size.height)
  }
}
캐러셀 광고 아이템 사이의 여백을 조절하려면, 앞뒤 광고 아이템을 부분적으로 노출하기에서 설정했던 spacing 값을 적절히 조절합니다.
final class CarouselViewController: UIViewController {
  // eg. spacing 값을 12로 설정합니다.
  private let spacing = 12

  // ...
}
| 답변 |
| -------------------------------------------------------------- | ------------------------------------------------------------------------------------------------------------------------------------------------------------------------------------------------------------------------------------------------- | | 액션형 광고에 유저 문의 버튼을 추가해야하는 이유가 궁금합니다. | 액션형 광고를 할당할 경우, 안정적인 서비스 운영을 위해 유저의 문의 기능이 반드시 구현되어야 합니다. 자세한 내용은 액션형 광고의 유저 문의 기능 추가하기 토픽을 참고하세요. |